<?xml version="1.0" encoding="utf-8"?><feed xmlns="http://www.w3.org/2005/Atom" ><generator uri="https://jekyllrb.com/" version="3.10.0">Jekyll</generator><link href="https://anson2251.github.io/feed.xml" rel="self" type="application/atom+xml" /><link href="https://anson2251.github.io/" rel="alternate" type="text/html" /><updated>2026-10-09T05:44:18+00:00</updated><id>https://anson2251.github.io/feed.xml</id><title type="html">Anson2251’s Blog</title><subtitle>Anson2251&apos;s Blog</subtitle><entry><title type="html">回到未来：我为什么用 htmx、模板引擎和 Tailwind 构建现代 Web 应用</title><link href="https://anson2251.github.io/web%20development/programming/2026/10/07/htmx-tailwind.html" rel="alternate" type="text/html" title="回到未来：我为什么用 htmx、模板引擎和 Tailwind 构建现代 Web 应用" /><published>2026-10-07T00:00:00+00:00</published><updated>2026-10-07T00:00:00+00:00</updated><id>https://anson2251.github.io/web%20development/programming/2026/10/07/htmx-tailwind</id><content type="html" xml:base="https://anson2251.github.io/web%20development/programming/2026/10/07/htmx-tailwind.html"><![CDATA[<style>
*:not(code, .katex *) {
    font-family: 'Segoe UI', Tahoma, Geneva, Verdana, sans-serif;
}

p {
    overflow: auto;
}

code, span:is(.highlight *) {
    font-family: 'Consola', 'Menlo', 'Courier New', Courier, monospace;
    border-radius: 4px;
    background-color: #f0f0f0 !important;
}

.highlight:is(pre)  {
    background-color: #f0f0f0 !important;
    box-shadow: inset 0 1px 1px rgba(255, 255, 2555, 0.3); 
    border-radius: 4px;

}

.highlight:is(div) {
    margin: 4px 8px;
    border-radius: 4px;

}
</style>

<link href="/assets/fonts/barlow.css" rel="stylesheet" />

<script type="module">
    import mermaid from 'https://cdn.jsdelivr.net/npm/mermaid@11/dist/mermaid.esm.min.mjs';
    mermaid.initialize({ startOnLoad: true, theme: 'neutral' });
    mermaid.run({
        querySelector: 'code.language-mermaid',
    });
</script>

<blockquote>
  <p>一个关于“复古工具”为何在今天依然成立的故事。</p>
</blockquote>

<hr />

<h2 id="1-一种似曾相识的感觉">1. 一种似曾相识的感觉</h2>

<p>最近我接了一个实时数据仪表盘。它需要用户登录、权限分级（管理员、志愿者、客户端各看各的）、一个几秒刷新一次的实时卡片网格、还有一堆密集的表单操作。听起来像是一个典型的 2026 年项目。</p>

<p>我的第一反应也是典型的 2026 年反应：React 加 React Router，React Query 管服务端状态，Zustand 管客户端状态，某个表单库，某个 CSS-in-JS 方案，再配一套 WebSocket 客户端。写到 <code class="language-plaintext highlighter-rouge">npm create</code> 的那一步，我停住了。</p>

<p>因为我的脑海里突然闪过 20 年前的解法。那时候页面是服务器给的，表单是真的 <code class="language-plaintext highlighter-rouge">&lt;form&gt;</code>，出错是真的 HTTP 状态码。用户提交，页面导航，就这么简单。当然，那个时代有它自己的地狱——ViewState、回传、服务器控件层层嵌套的不可预测性——所以我并不是在怀念它。我怀念的是那个<strong>心智模型</strong>：服务器懂页面，状态只有一个，HTML 是状态的投影。</p>

<p>然后我意识到，这十几年里我们不是”放弃了”那个模型，而是被浏览器当时的能力不足<strong>逼</strong>着离开了它。当时的浏览器只有粗笨的全页导航——XHR 虽然早就存在，但真正成熟、声明式的局部更新当时还不存在——所以我们才发明了客户端路由、客户端状态、客户端渲染，把一个完整的应用运行时塞进浏览器，只为了回避”每次交互都重新加载整个页面”的原始。</p>

<p>而今天，htmx 把这个漏洞补上了。</p>

<p>htmx 不是复古。htmx 补完了 HTML 当年没有兑现的承诺：让<strong>任何元素</strong>都能发起请求，让响应的 HTML <strong>替换目标片段</strong>，让服务器推送<strong>局部更新</strong>，而不是整页刷新。你不需要为此引入一个笨重的框架，你只需要给普通的 HTML 加上几个属性。</p>

<p>这篇文章想讲清楚的，是一套设计模式：<strong>为什么不做一个 SPA，为什么 htmx + 模板引擎 + Tailwind 这套组合能打，登录登出、错误处理、实时更新和交互式组件分别怎么落地</strong>。它跟具体语言无关——我用的是 Rust 和 axum，但你换成 Django、Rails、Phoenix、ASP.NET，论证依然成立。</p>

<hr />

<h2 id="2-为什么不做一个-spa">2. 为什么不做一个 SPA</h2>

<p>我不想用”SPA 是坏的”来立论——它不是，它在很多场景下是正解。我想说的是：<strong>在这个应用里，SPA 的每一层抽象，我都要付两次钱。</strong></p>

<h3 id="状态的双胞胎">状态的双胞胎</h3>

<p>这是最根本的一条。在一个 SPA 里，你永远在维护两份状态：服务器上的真实状态，和浏览器里的镜像状态。用户的积分是 100 分，这 100 分存在于数据库里，也存在于某个 React 组件树的 state 里。为了让这两份保持一致，你需要 cache invalidation、query keys、乐观更新、revalidation——一整套专门的库和心智负担，去解决一个<strong>你自己制造出来的</strong>同步问题。</p>

<p>而在服务端渲染的应用里，状态只有一个。页面就是状态的投影，仅此而已。服务器说”这个卡片现在的状态是 X”，浏览器就把 X 显示出来。没有第二份状态需要同步，因为从来没有第二份状态。</p>

<pre><code class="language-mermaid">flowchart TD
    subgraph SPA["SPA — 两份状态"]
        direction TD
        A["服务器状态"] &lt;--&gt;|"同步：缓存失效 / query keys / 乐观更新"| B["客户端镜像 state"]
    end
    subgraph HTMX["htmx — 一份状态"]
        direction TD
        C["服务器状态"] --&gt;|"渲染 HTML"| D["页面"]
    end
</code></pre>

<h3 id="路由的双胞胎">路由的双胞胎</h3>

<p>SPA 有两条路由系统：客户端路由（用户点链接，浏览器地址栏变化，React Router 决定渲染哪个组件），和服务端 API 路由（客户端去取数据的那套端点）。这两套路由要各自维护权限、各自的错误形态、各自的加载态。一个”只有管理员能看”的页面，你既要在前端守卫（不渲染），又要在后端守卫（不返回数据）——因为前端守卫永远可以被绕过。</p>

<p>服务端渲染的应用只有一套路由。权限在一个地方检查，页面在一个地方组装，链接就是真的链接，导航就是真的 HTTP 请求。</p>

<h3 id="构建成本">构建成本</h3>

<p>SPA 的前端是一条独立的生产线：打包链、Tree Shaking、代码分割、类型同步（前端 TypeScript 类型要和后端 DTO 对齐）、API 版本协商。这些工作的本质是：<strong>把 HTML 从服务器搬走，再把数据搬回来。</strong> 如果你本来的目标就是”服务器有状态，浏览器显示状态”，那你搬来搬去图什么呢？</p>

<blockquote>
  <p><strong>SPA 把浏览器当成一个应用运行时；htmx 把浏览器当成一个 HTML 渲染器。前者你需要一个框架，后者你只需要一个 Web 框架。</strong></p>
</blockquote>

<p>为了公平，我得说清楚什么时候 SPA 仍然是对的：离线优先的应用、复杂的客户端状态机（比如一个有几十种拖拽交互的编辑器）、富文本/协作编辑、以及那些”页面本身就是一个本地应用”的产品。这些场景里，客户端确实是一个运行时，而不是一个渲染器。但我这个仪表盘不是。</p>

<hr />

<h2 id="3-htmx--模板引擎--tailwind三件套为什么能搭">3. htmx + 模板引擎 + Tailwind：三件套为什么能搭</h2>

<p>单独看这三个工具，每个都不起眼。它们的威力来自组合。</p>

<h3 id="模板引擎服务端的组件">模板引擎：服务端的组件</h3>

<p>模板引擎（Askama、Jinja、ERB、Tera——随你喜欢哪个）给了你编译期的类型检查和自动 HTML 转义，更重要的是：它让你在<strong>服务端组装片段</strong>。</p>

<p>这里有个关键洞察：在 SPA 里你写一个 <code class="language-plaintext highlighter-rouge">&lt;Component&gt;</code> 返回 JSX；在 htmx 里你写一个模板函数，返回一段 HTML。<strong>粒度完全一样，但平台换成了 HTTP。</strong> 一个”卡片组件”就是一段模板，一个 handler 调它、填好数据、返回 HTML。</p>

<h3 id="htmx请求与替换的声明化">htmx：请求与替换的声明化</h3>

<p>htmx 把”发请求、换内容”这件事声明成了几个 HTML 属性。看一个最典型的例子：</p>

<div class="language-html highlighter-rouge"><div class="highlight"><pre class="highlight"><code><span class="nt">&lt;form</span> <span class="na">hx-post=</span><span class="s">"/sessions/42/assignments"</span>
      <span class="na">hx-target=</span><span class="s">"#card-17"</span>
      <span class="na">hx-swap=</span><span class="s">"outerHTML"</span><span class="nt">&gt;</span>
    <span class="nt">&lt;input</span> <span class="na">name=</span><span class="s">"exercise"</span> <span class="na">placeholder=</span><span class="s">"exercise"</span> <span class="na">required</span><span class="nt">&gt;</span>
    <span class="nt">&lt;button&gt;</span>Assign<span class="nt">&lt;/button&gt;</span>
<span class="nt">&lt;/form&gt;</span>
</code></pre></div></div>

<p>用户点下按钮，htmx 拦截提交，POST 到服务器。服务器返回一段<strong>新的卡片 HTML</strong>——就是原来那个卡片，但内容更新了。htmx 把这段 HTML 替换到 <code class="language-plaintext highlighter-rouge">#card-17</code> 的位置。没有 JSON，没有 client store，没有重渲染调度，没有 diff 算法。整个”更新一个卡片”的交互，就这三行属性加一个服务端模板函数。</p>

<h3 id="tailwind模板即组件">Tailwind：模板即组件</h3>

<p>因为样式写在模板里，<strong>模板就变成了组件</strong>。每个片段自带它的样式，你不再在 CSS 文件、JS 文件、组件文件之间跳来跳去。改一个卡片的样式，你改的是渲染那张卡片的模板。</p>

<p>而 utility class 的好处在这里会被无限放大——它让你几乎不用写 CSS。没有语义化类名、没有 BEM 那套命名、没有选择器层级，<code class="language-plaintext highlighter-rouge">flex</code>、<code class="language-plaintext highlighter-rouge">gap-3</code>、<code class="language-plaintext highlighter-rouge">text-sm</code>、<code class="language-plaintext highlighter-rouge">font-mono</code> 直接写在元素上。这个好处在别处只是”少敲几个字”；但到了模板的世界里，你的”组件”就是一段服务端片段，样式住在片段里、跟着片段一起被渲染和替换。一张卡片从服务器回来，样式已经齐了；改一张卡片的样式，改的就是那张卡片的模板。<strong>一个片段是自包含的</strong>—。结构、行为、样式都在同一个地方，你不需要在大脑里维护一张”这个 class 定义在哪、又在哪一层被覆盖”的地图，心智负担小得多。</p>

<p>更妙的是 Tailwind 的构建模型。它在构建时扫描你的模板文件，编译出一份静态 CSS。浏览器拿到的是<strong>一份</strong>带指纹缓存的 <code class="language-plaintext highlighter-rouge">app.css</code>。没有 runtime 的 CSS-in-JS，没有运行时注入 <code class="language-plaintext highlighter-rouge">&lt;style&gt;</code> 的成本，没有水合。样式的问题在构建期就全部解决完了，运行时干干净净。</p>

<h3 id="现代-ssr为了刷墙把房子拆了">现代 SSR：为了刷墙，把房子拆了</h3>

<p>有人可能会说：Next.js、Remix 不也做服务器渲染吗？</p>

<p>它们当然做。但它们的路子是<strong>既想要框架，又想要 SSR，于是把两者缝在一起</strong>：你照样写 React/Vue 组件、维护客户端状态、跑一整套打包链，然后框架再把这些东西”水合”（hydrate）到服务器渲染出来的 HTML 上。水合本身就是一笔开销；于是又冒出 Server Components、island 划分这些机制来<strong>减少</strong>水合——但这套东西一层套一层，边界和规则越来越多，全是为了调和”客户端框架”和”服务器渲染”这两股天然的张力。</p>

<p>这就是我说的”为了刷一面墙，把房子拆了”。你想让首屏快一点、SEO 好一点，结果引入了一整个 hydration 机制，去救那个<strong>本可以不存在</strong>的客户端运行时。htmx 走的是另一条路：<strong>根本不要客户端框架</strong>，于是”水合”这件事压根不存在——HTML 从服务器来，就是它最终的样子，没有第二次初始化，没有两份状态的交接。</p>

<p>（Astro 是这一族里最清醒的：默认零 JS、按需挂载 island。但它仍然要求你拥抱组件框架和构建链；而 htmx 的答案更彻底——连那个组件框架都不要。）</p>

<h3 id="复古的不是工具是心智模型">复古的不是工具，是心智模型</h3>

<p>这套东西写起来确实有 aspx 和 php 的既视感。因为当年 ASPX 和 PHP 那一代人不是笨，他们是对的：<strong>服务器负责状态，HTML 负责表达。</strong> 他们只是被工具拖累了：没有类型安全的模板，没有声明式的局部更新，没有一个真正可用的 CSS 系统，所以只好手写 <code class="language-plaintext highlighter-rouge">Response.Write</code> 和 <code class="language-plaintext highlighter-rouge">echo</code>，然后在全页回传的泥潭里挣扎。</p>

<p>今天我们用同样的心智模型，但配上了 2026 年该有的工具：类型安全的模板、属性驱动的局部更新、构建期编译的 CSS。<strong>复古的不是工具，是”服务器懂页面”这个想法——而它从来没错过。</strong></p>

<p>这些想法不是我发明的——Carson Gross 的《Hypermedia Systems》和 htmx 官网的 essays 专栏，早就把”超媒体作为应用状态的引擎”（HATEOAS）这件事讲得比我透彻得多。我在这里做的，只是把这些原则落进一个真实项目，然后诚实记录哪些地方顺利、哪些地方得补 JavaScript。文末附了深入阅读的链接。</p>

<hr />

<h2 id="4-登录与登出当表单变回真的表单">4. 登录与登出：当表单变回真的表单</h2>

<p>登录是”传统 Web”和 SPA 分歧最大的地方，也是最能说明”什么时候用 htmx、什么时候不用”的地方。</p>

<h3 id="一个反直觉的决定登录表单故意不用-htmx">一个反直觉的决定：登录表单故意不用 htmx</h3>

<p>我的登录表单就是一个朴素的 <code class="language-plaintext highlighter-rouge">&lt;form method="post"&gt;</code>，没有 <code class="language-plaintext highlighter-rouge">hx-*</code> 属性。</p>

<div class="language-html highlighter-rouge"><div class="highlight"><pre class="highlight"><code><span class="nt">&lt;form</span> <span class="na">method=</span><span class="s">"post"</span> <span class="na">action=</span><span class="s">"/login"</span> <span class="na">id=</span><span class="s">"login-form"</span><span class="nt">&gt;</span>
    <span class="nt">&lt;label&gt;</span>Username
        <span class="nt">&lt;input</span> <span class="na">name=</span><span class="s">"username"</span> <span class="na">autocomplete=</span><span class="s">"username"</span> <span class="na">required</span><span class="nt">&gt;</span>
    <span class="nt">&lt;/label&gt;</span>
    <span class="nt">&lt;label&gt;</span>Password
        <span class="nt">&lt;input</span> <span class="na">name=</span><span class="s">"password"</span> <span class="na">type=</span><span class="s">"password"</span> <span class="na">autocomplete=</span><span class="s">"current-password"</span> <span class="na">required</span><span class="nt">&gt;</span>
    <span class="nt">&lt;/label&gt;</span>
    <span class="nt">&lt;button</span> <span class="na">type=</span><span class="s">"submit"</span><span class="nt">&gt;</span>Log in<span class="nt">&lt;/button&gt;</span>
<span class="nt">&lt;/form&gt;</span>
</code></pre></div></div>

<p>为什么？因为登录成功之后的动作——写入会话、跳转到仪表盘——<strong>天然就是一次完整的页面导航</strong>，而不是一次局部片段替换。登录不是”把这段 HTML 换成那段 HTML”的操作，它是”把我从匿名状态切换成已登录状态”的身份转换；转换完成之后，整页都该重新渲染，而不是 swap 一个小片段。</p>

<p>更实际的理由来自浏览器的行为。一次真正的表单提交会让密码管理器正确地对 <code class="language-plaintext highlighter-rouge">autocomplete="current-password"</code> 自动填充，会让浏览器认得”这是一个登录表单”。而且——这一点对登录至关重要——<strong>一个普通的 <code class="language-plaintext highlighter-rouge">&lt;form&gt;</code> 在没有 JavaScript、或者 htmx 还没加载完成时，依然能工作</strong>。登录是用户进入你系统的第一道门，你不希望这道门依赖一个刚加载的 JS 库才能打开。</p>

<p>所以登录表单走<strong>真导航</strong>。<strong>htmx 不是”所有地方都要 htmx”，而是”在该用的地方用”。</strong> 登录这个场景，传统表单是更对的工具。</p>

<h3 id="同一个端点两种响应形态">同一个端点，两种响应形态</h3>

<p>但问题来了：同一个 <code class="language-plaintext highlighter-rouge">/login</code> 端点，可能被浏览器导航调用，也可能被 htmx 调用（如果你在别处用 htmx 触发了它）。服务器怎么区分？</p>

<p>答案是 <code class="language-plaintext highlighter-rouge">HX-Request</code> 这个请求头。htmx 会在它发出的每个请求里带上 <code class="language-plaintext highlighter-rouge">HX-Request: true</code>，服务器据此分支：</p>

<div class="language-text highlighter-rouge"><div class="highlight"><pre class="highlight"><code>def login_redirect(headers, dest, cookie):
    if is_htmx(headers):
        # htmx 调用：200 + HX-Redirect，让浏览器做真导航
        return Response(200, {"HX-Redirect": dest, "Set-Cookie": cookie})
    else:
        # 普通浏览器导航：经典 303
        return Response(303, {"Location": dest, "Set-Cookie": cookie})
</code></pre></div></div>

<p>两边最终都导向同一次真导航，区别只是触发方式不同。这个分支模式——<strong>根据 <code class="language-plaintext highlighter-rouge">HX-Request</code> 决定响应形态</strong>——会贯穿整个错误处理章节，是这套架构的基石之一。</p>

<h3 id="权限分级用提取器而不是中间件">权限分级：用提取器，而不是中间件</h3>

<p>登录成功之后，就是权限。这个应用有三种角色，看到完全不同的页面。我的做法是把”当前是谁、什么角色”做成一个请求提取器（extractor），路由声明自己需要哪种身份：</p>

<div class="language-text highlighter-rouge"><div class="highlight"><pre class="highlight"><code>class AdminPageAuth:
    # 从请求里解析出"管理员身份"，用于完整页面路由

    def from_request(state, request):
        match AdminAuth.from_request(state, request):
            case Ok(auth):
                return Ok(auth)
            case Err(Unauthorized(_)):
                # 未登录访问页面：303 到 /login，而不是一个 JSON 401
                return Err(Response(303, {"Location": "/login"}))
            case Err(e):
                return Err(e.into_response())
</code></pre></div></div>

<p><strong>同一个”未授权”，有两种响应形态</strong>：浏览器访问页面时，它需要被导航到登录表单；而 API 客户端调用时，它需要的是一个 <code class="language-plaintext highlighter-rouge">401</code> 加 JSON。原因很简单——浏览器需要的是页面，客户端需要的是结构化数据。提取器在这里做了正确的事：完整页面路由的未授权变成 303，API 路由的未授权变成 401 JSON，两者都源自同一个 <code class="language-plaintext highlighter-rouge">Unauthorized</code> 错误。</p>

<p>角色不对又是另一回事。一个志愿者访问管理员页面，正确的响应不是”请登录”，而是 <code class="language-plaintext highlighter-rouge">403</code>——你已经登录了，只是没权限。这个区分（401 未登录 vs 403 无权限）在很多系统里被糊在一起，在这里被明确地分开了。</p>

<h3 id="登出就这么多">登出：就这么多</h3>

<p>登出是一个 POST，服务器端吊销 token、清除 cookie，然后 303 回登录页。</p>

<div class="language-text highlighter-rouge"><div class="highlight"><pre class="highlight"><code>def logout(state, request):
    if session_cookie(request):
        revoke_token(session_cookie(request))
    return Response(303, {"Location": "/login", "Set-Cookie": clear_session_cookie()})
</code></pre></div></div>

<p>就这么多。没有 <code class="language-plaintext highlighter-rouge">localStorage.removeItem('jwt')</code>，没有 Redux reset，没有”清除所有 client-side 缓存”的仪式。因为状态本来就在服务器上，登出就是删掉服务器上的那条会话记录，然后清掉浏览器里的那个 cookie。</p>

<h3 id="几个自然浮现的安全细节">几个自然浮现的安全细节</h3>

<p>这些细节是”传统表单世界”里非常自然的做法，却在 SPA + JWT 的世界里反而会变得别扭：</p>

<ul>
  <li><strong>HttpOnly cookie</strong>：会话 token 放在 HttpOnly cookie 里，JavaScript 根本读不到，XSS 也偷不走。</li>
  <li><strong>密码哈希在后台线程做</strong>：argon2 这种哈希要跑约半秒，绝不能阻塞事件循环，丢进一个后台任务里。</li>
  <li><strong>速率限制按 (用户名, IP) 维度</strong>：防暴力破解，限制器在哈希之前先拦一道。</li>
  <li><strong>人机验证用显式渲染</strong>：因为登录是纯表单（真导航），所以 CAPTCHA 组件要每次 fresh render、token 单次消费——这正好配合”每次失败都重新渲染登录页”的流程。</li>
</ul>

<p>这些东西没有任何一个是 htmx 的专属功能，但它们都<strong>因为回到了真表单的模型而变得顺理成章</strong>。</p>

<h3 id="csrf旧威胁旧解法">CSRF：旧威胁，旧解法</h3>

<p>用 session cookie 做鉴权，就必须重新面对一个老朋友：CSRF。攻击者诱导用户的浏览器，在不知情的情况下向你的站点发出一个携带 session cookie 的状态变更请求——因为你用的是 cookie，浏览器会自动把它带上。</p>

<p>SPA + JWT 的世界里，这个问题基本被绕开了：token 放在 localStorage 里，由 JavaScript 手动塞进请求头，浏览器不会自动发送。但请注意，这只是把风险挪了地方——XSS 现在能直接偷走那个 token。而 cookie + HttpOnly 的路线里，token 是 JavaScript 读不到的，XSS 偷不走它——当然，XSS 仍能借受害者的已登录会话代为操作，只是拿不走凭证本身。代价是你得正面处理 CSRF。</p>

<p>好消息是，CSRF 的解法又老又成熟，而且因为表单是服务器渲染的，落地起来格外自然：</p>

<ul>
  <li><strong>SameSite 属性</strong>：给 cookie 标上 <code class="language-plaintext highlighter-rouge">SameSite=Lax</code>（现代浏览器的默认值）或 <code class="language-plaintext highlighter-rouge">Strict</code>，浏览器就不会在跨站请求里带上它——这已经挡住了绝大多数 CSRF。</li>
  <li><strong>CSRF token</strong>：一个随会话生成的密钥，服务器渲染表单时把它写进隐藏字段，提交时校验。因为是服务器渲染，塞进这个字段就是一行模板变量的事，不需要任何客户端逻辑。</li>
</ul>

<p>所以这又是一个”回到传统表单世界反而更省事”的地方：威胁是旧的，解法也是旧的，而且两者都已经被验证了几十年。</p>

<hr />

<h2 id="5-错误处理htmx-最深的坑也是最有价值的契约">5. 错误处理：htmx 最深的坑，也是最有价值的契约</h2>

<p>如果你只想从这篇文章里带走一件事，那就是这一节。因为 htmx 的错误处理藏着一个非常反直觉的坑——它会让你的应用在某些时刻<strong>静默地失败</strong>，而用户看到的只是一个什么都没发生的按钮。你一旦理解了这个问题，也就同时理解了这套架构里最优雅的部分：错误不再是一个散落在前端各处的杂务，而是一份可以放在一个函数里、被所有端点共享的契约。</p>

<h3 id="那个坑htmx-只-swap-成功响应">那个坑：htmx 只 swap 成功响应</h3>

<p>先想象一个最普通的场景。页面上有一张卡片，上面是一个表单，用户点下”确认”按钮，期待卡片被更新。在 SPA 里，你的 <code class="language-plaintext highlighter-rouge">fetch</code> 会拿到一个 Promise，不管是成功还是失败，你都能在 <code class="language-plaintext highlighter-rouge">.catch</code> 里做点什么。但在 htmx 里，流程是这样的：</p>

<ol>
  <li>htmx 拦截表单提交，发一个 XHR 请求到服务器。</li>
  <li>服务器返回响应。</li>
  <li>htmx 拿响应的 body 去替换你指定的目标元素。</li>
</ol>

<p>关键在第三步。htmx 的默认行为是：<strong>只有 2xx 的响应才会被 swap 进页面</strong>。如果你的端点返回了一个 400 或者 500，htmx 会触发一个 <code class="language-plaintext highlighter-rouge">htmx:responseError</code> 事件，然后……什么都不做。原来的 DOM 原封不动，你的错误信息躺在响应的 body 里，只有在浏览器的 devtools 网络面板里才能看到。</p>

<p>对于一个”用户点了按钮、然后盯着屏幕等反馈”的表单，这是灾难性的。没有红色提示，没有 toast，甚至没有控制台报错。用户会以为按钮坏了，再点一次，又点一次——每次服务器都在正确地拒绝这个请求，但每次拒绝都消失在空气里。</p>

<p>问题的根源在于：<strong>htmx 把”错误”默认当成了一件不该呈现给用户的事</strong>。这个默认值适合那种”后台轮询失败了就安静地重试”的场景，却完全不适合”用户在表单里填错了一个字段”的场景。</p>

<h3 id="那个解法双形态响应">那个解法：双形态响应</h3>

<p>所以我给自己定了一条规则，覆盖所有的 htmx 片段端点：</p>

<blockquote>
  <p>对 htmx 调用方，永远返回 200，把结果——无论成功还是失败——放进响应体里；对其他人，返回真实的状态码。</p>
</blockquote>

<p>拆开来看，这条规则有两个分支。</p>

<p><strong>成功的时候</strong>，返回 200，响应体就是要替换的那段新 HTML，再附带一个 <code class="language-plaintext highlighter-rouge">HX-Trigger</code> 头，通知浏览器弹一个成功的 toast。用户看到卡片变了，右上角还闪过一句”已保存”。</p>

<p><strong>失败的时候</strong>，仍然返回 200，但响应体里带一段”出错了”的提示，同时用一个 <code class="language-plaintext highlighter-rouge">HX-Reswap: none</code> 头告诉 htmx <strong>不要动目标元素</strong>。这样一来，卡片不会被清空，用户填的内容还在，而错误信息通过一个 out-of-band（OOB）的补丁单独写到页面的 toast 容器里。</p>

<p>而<strong>非 htmx 的调用方</strong>——没有 JavaScript 的浏览器、直接调 API 的客户端、跑测试的代码——它们根本不该知道 toast 这种东西存在。它们要的就是一个正经的 HTTP 状态码和一个结构化的 JSON 错误体。</p>

<p>整个机制的核心，是把”错误怎么呈现”这个决策收敛到一个函数里：</p>

<div class="language-text highlighter-rouge"><div class="highlight"><pre class="highlight"><code>def form_err(headers, error):
    if is_htmx(headers):
        # htmx 片段请求：永远 200，保留原 DOM，错误走 toast
        return Response(
            status=200,
            headers={
                "HX-Trigger": toast_trigger(error.message, "error"),
                "HX-Reswap": "none",
            },
            body=toast_oob(error.message, "error"),   # 一段 OOB 的 #toast HTML
        )
    else:
        # 普通调用方：真实状态码 + JSON 错误体
        return error.into_response()
</code></pre></div></div>

<p>失败分支返回的 200 是<strong>故意</strong>的，而不是偷懒。正是因为 htmx 只 swap 2xx，我们才需要把”失败”伪装成一个”成功拿到的响应”，让 htmx 愿意把它交给页面去处理。真正的失败信息通过 <code class="language-plaintext highlighter-rouge">HX-Trigger</code> 这个头，而不是状态码来传递。</p>

<h3 id="一个可能的反驳200-违反-http-语义吗">一个可能的反驳：200 违反 HTTP 语义吗？</h3>

<p>看到”永远返回 200”这条规则，一定会有人皱眉：这不是在说谎吗？错误就是错误，凭什么用 200 包装？</p>

<p>这其实是把两件不同的事混在了一起。关键要分清：<strong>这个请求要的”资源”是什么。</strong></p>

<p>对一个 htmx 片段请求来说，客户端要的不是”这次操作成功与否”这个事实，而是一段<strong>能放进那个 div 里的 HTML</strong>。服务器确实成功地生产出了这段 HTML——只不过这段 HTML 渲染出来的是一句错误提示。从这个角度看，200 是完全诚实的：请求成功了，响应体就是”渲染好的错误 DOM”。真正的业务错误（”字段填错了”这类）则通过 <code class="language-plaintext highlighter-rouge">HX-Trigger</code>（toast 消息）在带内传递。</p>

<p>而真正需要状态码语义的地方——API 客户端、没有 JS 的浏览器、测试、监控——我们<strong>没有</strong>破坏它们：这些调用方走的是另一条分支，拿到的是真实的 400/401/422 加 JSON。所以 HTTP 语义在它该生效的地方一分不少，只在”客户端明确要 HTML 片段”这一种情况里做了让步。</p>

<p>我得把话说准确：这<strong>不是</strong>在声称 HTTP 语义作废——404、409、422 这些状态码本来就是为业务结果准备的，它们也仍在错误枚举里照常用着。我们只是对”客户端要一段 HTML 片段”这一种情况做了一次务实的让步：htmx 只 swap 2xx（除非你调整 <code class="language-plaintext highlighter-rouge">htmx.config.responseHandling</code>），所以把”业务失败了”放进响应体、而不是状态码。另一条同样合理的路是监听 <code class="language-plaintext highlighter-rouge">htmx:responseError</code>、把真实的 4xx 响应体也 swap 进去；我们只是挑了更直白的这一条。</p>

<h3 id="一个意想不到的细节latin-1-头">一个意想不到的细节：Latin-1 头</h3>

<p><code class="language-plaintext highlighter-rouge">HX-Trigger</code> 这个头看着简单，实际用起来有一个坑会咬你一口——而且它只在非英文内容上才会暴露。</p>

<p>浏览器底层用 XHR 来发请求，而 XHR 拿到的响应头会被按 <strong>Latin-1（ISO-8859-1）</strong> 解码。这意味着如果你在 <code class="language-plaintext highlighter-rouge">HX-Trigger</code> 里塞了一段 UTF-8 文本——比如一句中文提示，或者一个 en-dash 字符——它到达浏览器的时候会变成乱码。一个 <code class="language-plaintext highlighter-rouge">Zone 60–120 bpm</code> 会变成 <code class="language-plaintext highlighter-rouge">Zone 60â120 bpm</code>。</p>

<p>我一开始完全没意识到这件事，直到某条包含非 ASCII 字符的 toast 在浏览器里显示成乱码。调试了好一会儿才定位到：不是我的服务器编码错了，是响应头这条通道本身就只能安全地承载 ASCII。</p>

<p>解法很直接：把 <code class="language-plaintext highlighter-rouge">HX-Trigger</code> 里的 JSON 序列化之后，把所有非 ASCII 字符转义成 <code class="language-plaintext highlighter-rouge">\uXXXX</code> 形式。结构化的 JSON 字符（引号、冒号、花括号）本来就是 ASCII，所以这个转换是安全的；而客户端用 <code class="language-plaintext highlighter-rouge">JSON.parse</code> 解析的时候，会自动把 <code class="language-plaintext highlighter-rouge">\uXXXX</code> 还原成真正的字符。乱码消失了，服务器发出去的东西和客户端解析出来的东西分毫不差。</p>

<div class="language-text highlighter-rouge"><div class="highlight"><pre class="highlight"><code># 服务器端：任何非 ASCII 字符都转成 \uXXXX
def toast_trigger(message, kind):
    payload = json.dumps({"toast": {"msg": message, "kind": kind}})
    return ascii_safe(payload)   # "Zone 60\u2013120 bpm \u00b7 done"

# 客户端：JSON.parse 自动还原
# "Zone 60–120 bpm · done"
</code></pre></div></div>

<p>这个细节代表的，其实是这类架构里一整个类别的经验：<strong>你不再和框架的抽象层搏斗，而是和 HTTP 本身的真实约束搏斗</strong>。这些约束是真实的、稳定的、可测试的，而一旦你理解了它们，你的代码就再也不会有这一类 bug。</p>

<h3 id="一份单一的来源错误枚举">一份单一的来源：错误枚举</h3>

<p>当错误处理被收敛到 <code class="language-plaintext highlighter-rouge">form_err</code> 一个地方之后，你自然会产生下一个需求：让”错误”这个概念本身也有一个单一的来源。</p>

<p>在 SPA 里，错误往往是散装的——前端有前端的错误常量，后端有后端的异常类，中间靠 HTTP 状态码这一层薄薄地对接。而在服务端渲染的架构里，你可以让一个枚举（或者一个异常层级）同时决定三件事：</p>

<ul>
  <li><strong>错误码</strong>（<code class="language-plaintext highlighter-rouge">bad_request</code>、<code class="language-plaintext highlighter-rouge">unauthorized</code>、<code class="language-plaintext highlighter-rouge">not_found</code>、<code class="language-plaintext highlighter-rouge">conflict</code>……）</li>
  <li><strong>HTTP 状态码</strong>（400、401、404、409……）</li>
  <li><strong>给用户看的人类可读信息</strong></li>
</ul>

<p>下面这个简化的枚举就是这种思路的写照：</p>

<div class="language-text highlighter-rouge"><div class="highlight"><pre class="highlight"><code>enum AppError:
    case BadRequest(message)
    case Unauthorized(message)
    case Forbidden(message)
    case NotFound(message)
    case RateLimited(message)
    case Internal(message)

    def code(self):
        # "bad_request", "unauthorized", ...
    def status(self):
        # 400, 401, 403, 404, 429, 500
    def message(self):
        # 人类可读的信息
</code></pre></div></div>

<p>于是整条链路就通了：一个 handler 里任何地方 <code class="language-plaintext highlighter-rouge">raise NotFound("no such session")</code>，它就会自动变成——对 htmx 一个红色 toast、对 API 一个 <code class="language-plaintext highlighter-rouge">404</code> 加 <code class="language-plaintext highlighter-rouge">{"type": "error", "code": "not_found", "message": "no such session"}</code>、对无 JS 的浏览器一个重渲染的 404 页面。<strong>三种出口，一个定义。</strong></p>

<p>内部错误和用户错误必须被区别对待。<code class="language-plaintext highlighter-rouge">Internal</code> 这类错误里可能藏着数据库的细节、栈信息、内部路径——这些东西<strong>永远不该</strong>出现在响应体里。正确的做法是在响应边界处把它们拦住：记录日志（让 <code class="language-plaintext highlighter-rouge">Internal</code> 的细节进日志），然后只给客户端一句笼统的 <code class="language-plaintext highlighter-rouge">"internal error"</code>。</p>

<div class="language-text highlighter-rouge"><div class="highlight"><pre class="highlight"><code>def into_response(self):
    status = self.status()
    if self is Internal(detail):
        log.error(detail)              # 细节只进日志
        message = "internal error"     # 客户端只看得到这句
    else:
        message = self.message()
    return Response(status, json({"type": "error", "code": self.code(), "message": message}))
</code></pre></div></div>

<p>这一行 <code class="language-plaintext highlighter-rouge">log.error(detail)</code> 放在响应边界，还有一个附带的好处：即使某个 handler 忘了在出错时打日志，只要它返回了 <code class="language-plaintext highlighter-rouge">Internal</code>，日志里就一定会有一条记录。你把”内部错误一定要被记录”这件纪律性的事，从”每个开发者都要记得”变成了”架构自动保证”。</p>

<h3 id="为什么这套东西在这里成立">为什么这套东西在这里成立</h3>

<p>回头看你可能会问：这些东西 SPA 里不是也能做吗？<code class="language-plaintext highlighter-rouge">fetch</code> 的 <code class="language-plaintext highlighter-rouge">.catch</code> 里弹个 toast 不就行了？</p>

<p>当然能。区别不在于能不能做，而在于<strong>做多少次</strong>。</p>

<p>在 SPA 里，错误处理是每个调用点各自的事。你有一个全局的拦截器，但每个组件仍然要决定自己失败时的样子——loading 态、error 态、重试按钮、边界组件。错误是前端应用里最容易悄悄漏掉的一块。</p>

<p>而在 htmx 架构里，错误的呈现被推回了服务器。服务器<strong>本来就知道</strong>发生了什么错、错到什么程度、该给用户看什么。而 htmx 的响应契约让你能把这个知识<strong>一次性地</strong>编码进 <code class="language-plaintext highlighter-rouge">form_err</code> 和 <code class="language-plaintext highlighter-rouge">AppError</code> 两个地方，然后每一个端点——不管是编辑卡片、批量分配、还是删除记录——都自动继承同一套行为。</p>

<p>这其实触及了这套架构最根本的哲学：<strong>把关于”状态”和”错误”的决策留在服务器端，让 HTML 只负责表达结果。</strong> 错误处理之所以重要，是因为它是这个哲学第一次变得具体、变得可触摸的地方。</p>

<hr />

<h2 id="6-实时更新sse-而不是-websocket">6. 实时更新：SSE 而不是 WebSocket</h2>

<p>仪表盘里最难的一环是实时性。卡片要几秒刷新一次，反映现场设备上传的数据。SPA 的标准答案是 WebSocket + 一个客户端渲染层。而在这里，答案简单得让人怀疑自己是不是漏了什么。</p>

<div class="language-html highlighter-rouge"><div class="highlight"><pre class="highlight"><code><span class="nt">&lt;body</span> <span class="na">hx-ext=</span><span class="s">"sse"</span><span class="nt">&gt;</span>
    <span class="nt">&lt;div</span> <span class="na">id=</span><span class="s">"grid"</span> <span class="na">sse-connect=</span><span class="s">"/stream"</span> <span class="na">sse-swap=</span><span class="s">"snapshot"</span><span class="nt">&gt;</span>
        
    <span class="nt">&lt;/div&gt;</span>
<span class="nt">&lt;/body&gt;</span>
</code></pre></div></div>

<p>htmx 的 SSE 扩展维护一条到 <code class="language-plaintext highlighter-rouge">/stream</code> 的服务端推送连接。<code class="language-plaintext highlighter-rouge">sse-swap="snapshot"</code> 声明的是：服务器会推送一个名为 <code class="language-plaintext highlighter-rouge">snapshot</code> 的事件，事件的数据体就是要替换进 <code class="language-plaintext highlighter-rouge">#grid</code> 的 HTML。所以服务器这一侧推送的<strong>不是 JSON 数据，而是已经渲染好的卡片 HTML</strong>：</p>

<div class="language-text highlighter-rouge"><div class="highlight"><pre class="highlight"><code>event: snapshot
data: &lt;div id="grid"&gt;...完整的卡片 HTML...&lt;/div&gt;
</code></pre></div></div>

<p>客户端拿到就 swap。当实时数据只是”服务器状态的投影”时，渲染这件事应该发生在拥有状态的那一侧——服务器——而不是在一个需要先重建状态的浏览器里再做一遍。这样你就<strong>少了一层客户端渲染</strong>：不再有”收到 JSON → 更新 store → 触发重渲染”这条链路，只有”收到 HTML → 替换 DOM”。</p>

<p>代价在服务器这一侧：你得管理这条长连接的生命周期——谁在听、连接断了要不要清掉、数据一变怎么广播给所有监听的客户端。这听起来吓人，但本质就是一个”订阅者列表 + 一个广播循环”，是每个后端框架都能做的老把戏，几十行就够（生产上当然还要处理慢消费者、断线重连的雪崩这些边角，但那是另一个话题）。而且它只做<strong>单向</strong>——数据从服务器流向浏览器，任何客户端主动发起的命令（比如编辑一张卡片）仍然走普通的 HTTP POST，实时通道不承担”往回传指令”的职责。</p>

<h3 id="为什么是-sse-而不是-websocket">为什么是 SSE 而不是 WebSocket</h3>

<p>因为实时更新在这个应用里是<strong>单向</strong>的——数据从服务器流向浏览器，浏览器几乎不往回发指令。SSE 就是为这个形状设计的：它是 HTTP 之上的一条长连接，<code class="language-plaintext highlighter-rouge">EventSource</code> 会自动重连，连接天然携带同源 cookie，所以它能无缝地复用你现有的 HTTP 鉴权——一个已经登录的用户，它的会话 cookie 会自动跟着 SSE 连接走，不需要额外的认证步骤。</p>

<p>WebSocket 的代价在于，它把”双向”这个你根本用不上的能力，作为你必须支付的成本塞了回来：断了不会自动重连，你要自己实现重试和心跳；它虽然同样是从 HTTP 握手升级而来（所以也能带 cookie），但它更像一条独立的双向管道，和”请求-响应-推送”这套 HTTP 生命周期是两张皮。当你只需要一条单向的推送流时，WebSocket 是杀鸡用牛刀。</p>

<h3 id="诚实一点dom-也是状态">诚实一点：DOM 也是状态</h3>

<p>我在第二节说”状态只有一个”。这句话被理想化了。</p>

<p>因为 DOM 本身就是第二份状态。用户正在一张卡片里填表单、展开了一个下拉框、焦点停在某个输入框里——这些都不是服务器知道的事，但它们是真真切切、用户正在持有的状态。这时候服务器推来一个 <code class="language-plaintext highlighter-rouge">snapshot</code>，把整个 <code class="language-plaintext highlighter-rouge">#grid</code> 换掉，用户的输入、展开的菜单、焦点，全都没了。比一张”过期的卡片”糟糕得多。</p>

<p>所以并发写入、多标签页、后退按钮这些”隐性的双状态”问题，并没有在服务端渲染架构里消失——它们只是换了形态。诚实一点的说法是：状态同步这件事，从”框架帮你管”变成了”你自己用 HTTP 原语管”。SSE 事件、<code class="language-plaintext highlighter-rouge">hx-swap</code>、OOB 补丁，就是你的原语；而”什么时候该让推送让步于用户正在做的事”，是你的责任，框架不会替你判断。</p>

<p>我们是这样管的：<strong>swap 的时候，跳过用户正在编辑的卡片。</strong></p>

<div class="language-text highlighter-rouge"><div class="highlight"><pre class="highlight"><code># 一张卡片"正在被编辑"，如果满足任一条件：
def card_is_editing(card):
    focus = document.active_element
    if focus 落在 card 内，且 focus 是输入框（input / textarea / select）:
        return true
    if card 内有一个打开的编辑表单:
        return true
    return false
</code></pre></div></div>

<p>于是每条 <code class="language-plaintext highlighter-rouge">card</code> 事件到达时，先检查目标卡片是否在编辑——是，就 <code class="language-plaintext highlighter-rouge">preventDefault()</code>，跳过这次 swap，让那一秒的更新作废。而整网的 <code class="language-plaintext highlighter-rouge">snapshot</code> 则更谨慎：只要有<strong>任何一张</strong>卡片在编辑，就把这次 snapshot 暂存起来，等编辑结束再应用——代价是编辑期间整张网格都跟着停在旧状态。广播是一秒一拍，所以在编辑的卡片不会永远停在旧状态：编辑一结束，下一拍就带来一张新鲜的。</p>

<p>你确实要为此写一小段 JavaScript，专门在”实时推送”和”用户在做的交互”之间做仲裁。它不优雅，但它诚实——它承认了 DOM 是状态，然后显式地决定这两份状态谁在什么时候让谁。这正是这套架构真正的样子：没有魔法，只有把 HTTP 原语一件一件摆清楚。</p>

<hr />

<h2 id="7-岛屿当一块页面真的需要活着">7. 岛屿：当一块页面真的需要”活着”</h2>

<p>写到这里，一个读者会问：这一切都很好，但我要一个真正的交互式组件怎么办——带标签切换、能实时刷新的图表，那种点一下 tab 就换一组数据、鼠标划过能看 tooltip 的东西？htmx 的局部替换能处理表单和列表，但处理不了”浏览器里有一个需要自己管理状态的 widget”。</p>

<p>答案是承认它，然后给它划出一块小小的、自包含的”岛屿”（island）。这不是对前面论证的背叛，而是把那条界线画清楚。</p>

<h3 id="大多数页面是服务器渲染的少数不是">大多数页面是服务器渲染的，少数不是</h3>

<p>在我的仪表盘里，绝大多数页面遵循同一套规则：服务器渲染 HTML，htmx 负责局部更新。但有一处例外——参与者的历史详情页，里面有一张图表。它有”本次会话 / 跨会话”两个 tab、一个实时跳动的帧计数、一条汇总行，还有一张 Chart.js 画的折线图。</p>

<p>这个 widget 需要一种服务器渲染很难提供的东西：<strong>客户端状态</strong>。用户点 tab，图表切换数据源，但服务器并不需要知道”当前显示哪个 tab”——这是纯呈现层的状态，和服务器无关。强行用 htmx 去做，每切一次 tab 都要服务器往返一次，为了一个本地 UI 状态去打断用户体验，得不偿失。</p>

<p>所以这张图表是一座岛屿：页面上一个自包含、带自己运行时的小块，周围的一切仍然是服务器渲染的。</p>

<pre><code class="language-mermaid">flowchart TD
    Page["详情页（服务器渲染）"]
    Page --&gt; Header["头部与静态字段"]
    Page --&gt; Panel["#detail-panel 表单区&lt;br/&gt;（htmx 局部替换）"]
    Page --&gt; Island["历史图表 island&lt;br/&gt;（petite-vue + Chart.js）"]
</code></pre>

<div class="language-html highlighter-rouge"><div class="highlight"><pre class="highlight"><code><span class="nt">&lt;div</span>
    <span class="na">v-scope=</span><span class="s">"HistoryChart({ pid: 42, cutoff: 0.6 })"</span>
    <span class="err">@</span><span class="na">vue:mounted=</span><span class="s">"start"</span>
    <span class="err">@</span><span class="na">vue:unmounted=</span><span class="s">"stop"</span>
<span class="nt">&gt;</span>
    <span class="nt">&lt;button</span> <span class="err">@</span><span class="na">click=</span><span class="s">"setTab('session')"</span> <span class="na">:disabled=</span><span class="s">"tab === 'session'"</span><span class="nt">&gt;</span>This session<span class="nt">&lt;/button&gt;</span>
    <span class="nt">&lt;button</span> <span class="err">@</span><span class="na">click=</span><span class="s">"setTab('all')"</span> <span class="na">:disabled=</span><span class="s">"tab === 'all'"</span><span class="nt">&gt;</span>Across sessions<span class="nt">&lt;/button&gt;</span>
    <span class="nt">&lt;span</span> <span class="na">v-if=</span><span class="s">"headerCode"</span><span class="nt">&gt;</span> ·  frames<span class="nt">&lt;/span&gt;</span>
    <span class="nt">&lt;canvas&gt;&lt;/canvas&gt;</span>
<span class="nt">&lt;/div&gt;</span>
</code></pre></div></div>

<p>这里我用的是 petite-vue——一个 6KB、无构建步骤的迷你 Vue，专为”给一小块 HTML 加上反应性”而生。它不是第二套完整框架，只是一个让岛屿内部能响应用户输入的小工具。</p>

<h3 id="岛屿仍然尊重核心原则">岛屿仍然尊重核心原则</h3>

<p>岛屿里可以有客户端状态，但<strong>数据仍然来自服务器</strong>。这张图表初始化时用同源 fetch 拉历史记录，带的是现有的会话 cookie——鉴权没有任何额外复杂度。而它的实时性走的是上一节讲的那条 EventSource（SSE）——同一条流上承载着多个命名事件：网格收到 <code class="language-plaintext highlighter-rouge">snapshot</code> 去换 HTML，岛屿收到 <code class="language-plaintext highlighter-rouge">card</code> 就重新拉取自己的数据。数据仍然只有一个来源，岛屿只是那个来源的一个活跃视图。</p>

<p>这是一条分界线：岛屿持有的是<strong>短暂的、呈现层的状态</strong>——哪个 tab 被选中、图表当前画到哪一帧。服务器的状态——记录本身、质量阈值、哪些帧有效——仍然是唯一的事实来源，仍然由服务器拥有。你引进了一个小小的运行时，但没有引进第二份需要同步的真相。</p>

<h3 id="岛屿必须住在-swap-之外">岛屿必须住在 swap 之外</h3>

<p>岛屿还有一个容易踩的纪律：<strong>它不能待在 htmx 的 swap 目标里。</strong></p>

<p>原因在挂载时机。petite-vue 的 <code class="language-plaintext highlighter-rouge">createApp().mount()</code> 只在页面加载时执行一次，它编译的是那一刻 DOM 里已经存在的 <code class="language-plaintext highlighter-rouge">[v-scope]</code> 元素。而 htmx 是之后才把新 HTML swap 进页面的——如果这段 swap 进来的 HTML 里含有一个 <code class="language-plaintext highlighter-rouge">v-scope</code>，petite-vue 根本不知道它的存在，它只是一堆不会被响应式化的死标签。想让它活过来，你就得在每个 swap 之后手动重新挂载，同时还得自己处理上一次挂载的销毁、事件监听和 EventSource 的释放。这条路一旦走进去，你就把两套运行时缝合在了一起，复杂度会报复性地涨回来。</p>

<p>所以实际操作里，swap 目标和岛屿在 DOM 里是<strong>并列的兄弟，而不是嵌套的父子</strong>。回到那张详情页：上面是一个 <code class="language-plaintext highlighter-rouge">#detail-panel</code> 的 swap 目标，里面是纯表单——设置区间、分配动作，这些走 htmx 局部替换；下面是一张图表的 island，它不靠 htmx 换，而是靠自己的同源 fetch 加 EventSource 刷新自己。两条更新通道各管各的，互不嵌套。</p>

<p>这条纪律和上一节是同一件事的两个面：岛屿的数据不来自 htmx 的响应体，而来自它自己拉的那条线。正因为这样，它才能安心地待在 swap 之外，不需要被任何局部替换连根拔起。</p>

<h3 id="一个熟悉的代价">一个熟悉的代价</h3>

<p>岛屿不是免费的。你重新引入了客户端状态、一个手写的 JS 文件、以及第二个运行时（petite-vue）。”SPA 的成本”回来了，只是被严格限制在了一个几十行的小方块里，而不是弥漫到整个应用。</p>

<p>还有那种只有踩过才会知道的坑。petite-vue 会把作用域里的每个属性深度包装成 Proxy 来做反应性，这通常很好；但如果你把 Chart.js 的实例或 EventSource 放进响应式作用域，它们的内部槽位会被 Proxy 破坏，方法调用直接报错。解法是把这些实例放在闭包局部变量里，让它们对反应性系统不可见。这和前面那个 Latin-1 响应头是同一类经验：你搏斗的对象从”框架的抽象”变成了”某个具体机制的边界”，而后者一旦理解，就再也不会出错。</p>

<h3 id="岛屿架构而不是全有或全无">岛屿架构，而不是”全有或全无”</h3>

<p>如果你熟悉 Astro，你会在”岛屿架构”这个词里认出这个模式。区别只是：Astro 把它做成了框架的一等公民，而这里是手搓的、更小的一撮。两者背后的判断是同一个——<strong>决定哪些东西需要客户端运行时，是一个一个组件做的，而不是整个应用一起做的。</strong></p>

<p>最重要的判断，其实是这个：htmx 的价值从来不在”拒绝 JavaScript”，而在于”把 JavaScript 的使用推迟到真正需要它的地方”。绝大多数交互——一个表单、一次列表刷新、一个错误提示——用 HTML 和 HTTP 就够；只有当你遇到一个真正需要自己管理状态的 widget 时，才划出一座岛屿。默认服务器渲染，按需引入运行时，而不是反过来。</p>

<hr />

<h2 id="8-什么时候这个模式是对的">8. 什么时候这个模式是对的</h2>

<p>我不想把它写成一封 htmx 的劝退信或安利信。它是工具，工具要放在对的场景里。这张清单是我的判断：</p>

<p><strong>这个模式适合你，当：</strong></p>

<ul>
  <li>应用本质上是”服务器状态的多个视图”——仪表盘、后台管理、内容展示。</li>
  <li>表单密集、CRUD 主导。</li>
  <li>实时性以推送为主，不在客户端做复杂交互。</li>
  <li>团队后端强于前端，或者你根本不想维护两套代码和两条构建链。</li>
  <li>你希望”登出就真的登出了”，”状态就真的只有一份”。</li>
</ul>

<p><strong>这个模式不适合你，当：</strong></p>

<ul>
  <li>需要离线优先。</li>
  <li>客户端有复杂的本地状态机（拖拽、富文本编辑、协作编辑）。</li>
  <li>页面本身就是一个本地应用，而不是服务器状态的投影。</li>
</ul>

<p>在这些场景里，浏览器确实是一个运行时，SPA 就是正解。</p>

<hr />

<h2 id="结语那个心智模型一直是对的">结语：那个心智模型一直是对的</h2>

<p>ASPX 和 PHP 那一代人不是笨，只是合适的工具还没有发展出来。他们的直觉——<strong>服务器负责状态，HTML 负责表达</strong>——从头到尾都没错，错的是他们手里的工具：没有类型安全的模板，没有声明式的局部更新，没有真正可用的 CSS 系统，没有一条干净的实时推送通道。</p>

<p>htmx 补上了局部更新，模板引擎补上了类型安全，Tailwind 补上了样式，SSE 补上了实时。当这些工具到齐了，那个旧的心智模型突然又变得现代了——不是因为世界倒退回了 2005 年，而是因为”服务器懂页面”这个想法，一直在那里等着被重新兑现。</p>

<p>如果你也曾经在 <code class="language-plaintext highlighter-rouge">node_modules</code> 的深处、在两条路由表之间、在缓存失效的泥潭里感到过疲惫，也许值得回头看一眼。你会发现，你并不是在往后退，而是在找回一条本来就对的路。</p>

<hr />

<h2 id="进一步阅读">进一步阅读</h2>

<ul>
  <li>《Hypermedia Systems》——Carson Gross、Adam Stepinski、Denis Pashevsky 著，免费在线阅读：hypermedia.systems。这本书是上面所有想法的系统论述，比这篇文章完整得多。</li>
  <li>htmx 官网的 essays 专栏（htmx.org/essays）——”超媒体作为应用状态的引擎”（HATEOAS）、什么时候该用超媒体、什么时候该用 SPA，那里有更严谨的讨论。</li>
  <li>htmx 官方文档（htmx.org/docs）——本文提到的 <code class="language-plaintext highlighter-rouge">hx-swap</code>、<code class="language-plaintext highlighter-rouge">HX-Trigger</code>、SSE 扩展等所有属性的权威参考。</li>
</ul>]]></content><author><name></name></author><category term="Web Development" /><category term="Programming" /><summary type="html"><![CDATA[]]></summary></entry><entry><title type="html">物理笔记：一份 (略微冗长的 划掉） 简短的阻抗介绍</title><link href="https://anson2251.github.io/physics/electrical%20engineering/2025/08/07/a-brief-introduction-on-impedance.html" rel="alternate" type="text/html" title="物理笔记：一份 (略微冗长的 划掉） 简短的阻抗介绍" /><published>2025-08-07T00:00:00+00:00</published><updated>2025-08-07T00:00:00+00:00</updated><id>https://anson2251.github.io/physics/electrical%20engineering/2025/08/07/a-brief-introduction-on-impedance</id><content type="html" xml:base="https://anson2251.github.io/physics/electrical%20engineering/2025/08/07/a-brief-introduction-on-impedance.html"><![CDATA[<style>
*:not(code, .katex *) {
    font-family: 'Segoe UI', Tahoma, Geneva, Verdana, sans-serif;
}

p {
    overflow: auto;
}

code, span:is(.highlight *) {
    font-family: 'Consola', 'Menlo', 'Courier New', Courier, monospace;
    border-radius: 4px;
    background-color: #f0f0f0 !important;
}

.highlight:is(pre)  {
    background-color: #f0f0f0 !important;
    box-shadow: inset 0 1px 1px rgba(255, 255, 2555, 0.3); 
    border-radius: 4px;

}

.highlight:is(div) {
    margin: 4px 8px;
    border-radius: 4px;

}
</style>

<link href="/assets/fonts/barlow.css" rel="stylesheet" />

<link rel="stylesheet" href="https://cdn.jsdelivr.net/npm/katex@0.18.6/dist/katex.min.css" integrity="sha384-M59ezskvvpvT+a+C1x088YJ3DVmK+wZdX0UkVKalOI4Qi5Nwv0WrvpqHcfa2HQqB" crossorigin="anonymous" />

<!-- The loading of KaTeX is deferred to speed up page rendering -->
<script defer="" src="https://cdn.jsdelivr.net/npm/katex@0.18.6/dist/katex.min.js" integrity="sha384-7jGyG5zFwmEamqNWdCbpsPn+GTWEis3lnV7X/jXHyhFpJG7ExABLyMapabg8F4+p" crossorigin="anonymous"></script>

<!-- To automatically render math in text elements, include the auto-render extension: -->
<script defer="" src="https://cdn.jsdelivr.net/npm/katex@0.18.6/dist/contrib/auto-render.min.js" integrity="sha384-bjyGPfbij8/NDKJhSGZNP/khQVgtHUE5exjm4Ydllo42FwIgYsdLO2lXGmRBf5Mz" crossorigin="anonymous" onload="renderMathInElement(document.body, {
      delimiters: [
        {left: '$$', right: '$$', display: true},   // Block math
        {left: '$', right: '$', display: false},    // Inline math (Enabled manually)
        {left: '\\(', right: '\\)', display: false},
        {left: '\\[', right: '\\]', display: true}
      ],
      throwOnError : false
    });"></script>

<script type="module">
    import mermaid from 'https://cdn.jsdelivr.net/npm/mermaid@11/dist/mermaid.esm.min.mjs';
    mermaid.initialize({ startOnLoad: true, theme: 'neutral' });
    mermaid.run({
        querySelector: 'code.language-mermaid',
    });
</script>

<p>最近在学习电子设计，发现阻抗一词（impedance）出现得非常频繁，但之前在高中物理中却几乎没有涉及，因此决定写一篇笔记来整理一下阻抗相关的内容。</p>

<h2 id="1-写在前面回顾电阻-resistance-r">1. 写在前面：回顾电阻 (Resistance $R$)</h2>

<blockquote>
  <p>电阻是导体对直流电的阻碍作用，其大小与导体的电阻率、长度和横截面积有关。</p>
</blockquote>

<h3 id="电阻概念的历史起源">电阻概念的历史起源</h3>

<p>电阻的概念可以追溯到19世纪初电学研究的早期。在1827年，德国物理学家格奥尔格·欧姆（Georg Ohm）通过一系列精巧的实验，发现了电压、电流和电阻之间的关系，这便是我们今天所熟知的欧姆定律。</p>

<p>欧姆的实验装置相对简单：他使用伏打电堆作为电源，通过不同长度的导线，并使用扭秤测量电流的磁效应（当时尚无直接的电流测量仪器）。通过系统地改变导线长度和材料，欧姆发现电流与电压成正比，与导线长度成反比，这一发现奠定了电路理论的基础。</p>

<h3 id="电阻是什么">电阻是什么</h3>

<p>从微观角度看，电阻的本质源于<strong>电子在导体中运动时与原子晶格（Lattice）的碰撞</strong>。当电场施加在导体两端时，自由电子受到电场力的作用而定向移动，形成电流。然而，这种碰撞阻碍了电子的自由运动，从而产生了电阻效应。</p>

<p>电阻的单位是欧姆 (Ohm, $\Omega$)，其与电压和电流的关系为欧姆定律：</p>

\[V = IR \tag{1.1}\]

<p>其中 $V$ 是电压，$I$ 是电流，$R$ 是电阻。</p>

<h3 id="电阻的影响因素">电阻的影响因素</h3>

<p>电阻值的大小取决于以下几个因素：</p>

<ol>
  <li><strong>材料特性</strong>：不同材料的电阻率不同，如银、铜、铝等良导体的电阻率较低，而橡胶、玻璃等绝缘体的电阻率极高。</li>
  <li>
    <p><strong>几何形状</strong>：电阻与导体的长度成正比，与横截面积成反比，这一关系可表示为：</p>

\[R = \rho \frac{L}{A} \tag{1.2}\]

    <p>其中 $\rho$ 是电阻率，$L$ 是长度，$A$ 是横截面积。</p>
  </li>
  <li><strong>温度</strong>：对于大多数金属导体，电阻随温度升高而增大（由于晶格振动加剧导致电子碰撞变得更加频繁）；而对于半导体和电解质，电阻可能随温度升高而减小。</li>
</ol>

<p>在理想情况下，电阻值不随电压或电流的变化而变化，这种电阻称为线性电阻。然而，在实际应用中，许多元件的电阻会随工作条件的变化而改变。</p>

<p>电阻的概念为我们理解电路中的能量耗散提供了基础，但它只描述了电路行为的一个方面。当我们从直流电转向交流电时，电路的行为变得更加复杂，我们需要引入新的概念来全面描述电路的特性。</p>

<h2 id="2-从直流到交流电路行为的演变">2. 从直流到交流：电路行为的演变</h2>

<h3 id="直流电-dc-的特性">直流电 (DC) 的特性</h3>

<p>直流电（Direct Current, DC）是我们最先接触的电学概念。在直流电路中，电流的大小和方向保持恒定，不会随时间变化。这种稳定性使得直流电路的分析相对简单，欧姆定律足以描述大多数情况下的电路行为。</p>

<p>直流电的特点：</p>

<ul>
  <li>电流方向恒定</li>
  <li>电流大小恒定</li>
  <li>只需考虑电阻对电流的阻碍作用</li>
  <li>能量主要以热能形式消耗在电阻上</li>
</ul>

<h3 id="交流电-ac-的复杂性">交流电 (AC) 的复杂性</h3>

<p>交流电（Alternating Current, AC）则完全不同，它的大小和方向随时间周期性变化。最常见的交流电是正弦波交流电，其数学表达式为：</p>

\[I(t) = I_0 \sin(\omega t + \phi) \tag{2.1}\]

<p>其中 $I_0$ 是电流幅值，$\omega$ 是角频率，$t$ 是时间，$\phi$ 是初相位。</p>

<p>交流电的引入使电路分析变得复杂，因为：</p>

<ol>
  <li><strong>时变性</strong>：电压和电流随时间变化，需要考虑瞬时值和有效值</li>
  <li><strong>方向性</strong>：电流方向周期性反转，改变了电磁场的分布</li>
  <li><strong>频率依赖性</strong>：电路元件的行为随频率变化而不同</li>
  <li><strong>相位关系</strong>：电压和电流之间可能出现相位差</li>
</ol>

<h3 id="交流电中的特殊现象">交流电中的特殊现象</h3>

<p>在交流电路中，我们观察到了一些直流电路中不存在的现象：</p>

<ol>
  <li><strong>电磁感应</strong>：变化的电流产生变化的磁场，进而产生感应电动势</li>
  <li><strong>电容效应</strong>：变化的电压导致电容器极板上的电荷积累和释放</li>
  <li><strong>趋肤效应</strong>：高频电流倾向于在导体表面流动，有效横截面积减小</li>
  <li><strong>辐射效应</strong>：高频交流电会以电磁波形式辐射能量</li>
</ol>

<p>这些现象的出现，使得简单的欧姆定律不再足以描述交流电路中的全部行为。我们需要引入更复杂的概念——阻抗，来全面描述交流电路中的电压-电流关系。</p>

<p>然而，在深入探讨阻抗概念之前，我们需要先了解交流电路中的两个关键元件：电感和电容。正是这两个元件的存在，使得交流电路表现出与直流电路完全不同的特性，也使得阻抗概念变得必要。</p>

<h2 id="3-电感与电容交流电路中的特殊元件">3. 电感与电容：交流电路中的特殊元件</h2>

<h3 id="电感的物理原理">电感的物理原理</h3>

<p>电感（Inductance）是电路中一种重要的储能元件，它的存在源于电磁感应现象。1831年，英国科学家迈克尔·法拉第（Michael Faraday）发现了电磁感应定律，为电感现象奠定了理论基础。</p>

<h4 id="电感的物理本质">电感的物理本质</h4>

<blockquote>
  <p>自感现象：当电流通过导体时，会在导体周围产生磁场。如果电流发生变化，磁场也会随之变化，这种变化的磁场会在导体中产生感应电动势，这个感应电动势的方向总是阻碍电流的变化。</p>
</blockquote>

<p>电感的数学表达式为：</p>

\[V_L = L \frac{\mathrm dI}{\mathrm dt} \tag{3.1}\]

<p>其中 $v_L$ 是电感两端的电压，$L$ 是电感量，$\frac{\mathrm dI}{\mathrm dt}$ 是电流变化率。</p>

<p>这个公式告诉我们，由于自感现象，电感两端的电压与电流的变化率成正比，而不是与电流本身成正比。这正是电感与电阻的根本区别：<strong>电阻阻碍电流的流动，而电感阻碍电流的变化</strong>。</p>

<p>如果电阻对应物理世界中的摩擦力，那么电感则对应于物理世界中带有惯性（inertia）的物体。电感元件在电路中储存和释放能量，其能量形式为磁场能。</p>

<h4 id="电感在交流电路中的行为">电感在交流电路中的行为</h4>

<p>在交流电路中，电流随时间正弦变化：</p>

\[I(t) = I_0 \sin(\omega t) \tag{3.2}\]

<p>根据电感的电压公式 $(3.1)$，我们可以得到：</p>

\[V_L(t) = L \cdot \frac{\mathrm d}{\mathrm dt}[I_0 \sin(\omega t)] = L \cdot \omega I_0 \cos(\omega t) = \omega L I_0 \sin\left(\omega t + \frac{\pi}{2}\right) \tag{3.3}\]

<p>这表明电感两端的电压超前电流 $\dfrac{\pi}{2}$。这种相位差是交流电路中电感的特征行为。</p>

<p>电感对交流电的阻碍作用称为感抗（Inductive Reactance），其大小为：</p>

\[X_L = \omega L = 2\pi fL \tag{3.4}\]

<p>感抗随频率的增加而增加，因此电感对高频信号的阻碍作用更强</p>

<h3 id="电容的物理原理">电容的物理原理</h3>

<p>电容（Capacitance）是另一种重要的储能元件，它的历史可以追溯到18世纪中叶，当时荷兰科学家彼得·范·穆森布鲁克（Pieter van Musschenbroek）发明了莱顿瓶，这是最早的电容器。</p>

<h4 id="电容的物理本质">电容的物理本质</h4>

<p>电容是由两个相互绝缘的导体（极板）组成的系统。当在两极板间施加电压时，正电荷会聚集在一个极板上，负电荷会聚集在另一个极板上，形成电场。</p>

<p>电容的定义为：</p>

\[C = \frac{Q}{V} \tag{3.5}\]

<p>其中 $C$ 是电容量，$Q$ 是极板上的电荷量，$V$ 是两极板间的电压</p>

<p>电容的 $I-V$ 关系为：</p>

\[I_C = C \frac{\mathrm dV}{\mathrm dt} \tag{3.6}\]

<p>这表明电容中的电流与电压的变化率成正比，即充放电过程，而不是与电压本身成正比。这是电容与电阻的根本区别。</p>

<p>如果将电阻比作物理世界中的摩擦力，那么电容则对应于物理世界中的弹性（elasticity）。电容元件在电路中储存和释放能量，其能量形式为电场能</p>

<h4 id="电容在交流电路中的行为">电容在交流电路中的行为</h4>

<p>在交流电路中，电压随时间正弦变化：</p>

\[V(t) = V_0 \sin(\omega t) \tag{3.7}\]

<p>根据电容的电流公式，我们可以得到：</p>

\[I_C(t) = C \frac{\mathrm d}{\mathrm dt}[V_0 \sin(\omega t)] = C \cdot \omega  V_0 \cos(\omega t) = \omega C V_0 \sin\left(\omega t + \frac{\pi}{2}\right) \tag{3.8}\]

<p>这表明电容中的电流超前电压 $\dfrac{\pi}{2}$，与电感的情况正好相反。</p>

<p>电容对交流电的阻碍作用称为容抗（Capacitive Reactance），其大小为：</p>

\[X_C = \frac{1}{\omega C} = \frac{1}{2\pi fC} \tag{3.9}\]

<p>容抗随频率的增加而减小，因此<strong>电容对高频信号的阻碍作用较弱，对低频信号的阻碍作用较强</strong>。</p>

<h3 id="电感与电容的对比">电感与电容的对比</h3>

<table>
  <thead>
    <tr>
      <th>特性</th>
      <th>电感</th>
      <th>电容</th>
    </tr>
  </thead>
  <tbody>
    <tr>
      <td>储能形式</td>
      <td>磁场能</td>
      <td>电场能</td>
    </tr>
    <tr>
      <td>电压-电流关系</td>
      <td>$V_L = L \dfrac{\mathrm dI}{\mathrm dt}$</td>
      <td>$I_C = C \dfrac{\mathrm dV}{\mathrm dt}$</td>
    </tr>
    <tr>
      <td>相位关系</td>
      <td>电压超前电流 $\dfrac{\pi}{2}$</td>
      <td>电流超前电压 $\dfrac{\pi}{2}$</td>
    </tr>
    <tr>
      <td>频率特性</td>
      <td>感抗随频率增加而增加</td>
      <td>容抗随频率增加而减小</td>
    </tr>
    <tr>
      <td>直流特性</td>
      <td>对直流相当于短路</td>
      <td>对直流相当于开路</td>
    </tr>
  </tbody>
</table>

<p>电感和电容的这些特性，使它们在交流电路中表现出与电阻完全不同的行为，也为我们理解阻抗概念奠定了基础。</p>

<p>现在我们已经了解了电阻、电感和电容的基本特性，是时候将它们统一在一个框架下了。阻抗概念正是为了描述这些元件在交流电路中的综合行为而引入的，它不仅包含了能量耗散，也包含了能量存储和相位关系。</p>

<h2 id="4-关于阻抗电阻但不只是电阻">4. 关于阻抗：电阻，但不只是电阻</h2>

<h3 id="什么是阻抗-impedance-z-">什么是阻抗 (Impedance $Z$) ？</h3>

<blockquote>
  <p>阻抗（Electrical Impedance）又称电阻抗，是电路中电阻、电感、电容对交流电的阻碍作用的统称</p>

  <p>- From <a href="https://zh.wikipedia.org/zh/阻抗">wikipedia</a></p>
</blockquote>

<p>阻抗由以下部份组成：</p>

<pre><code class="language-mermaid">flowchart TD
    Z[阻抗 Z] --&gt; R[电阻 R：阻碍直流]
    Z --&gt; X[电抗 X：阻碍交流]
    X --&gt; XL[感抗 Xₗ：线圈反抗电流变化]
    X --&gt; XC[容抗 Xc：电容反抗电压变化]
</code></pre>

\[Z = R + jX\]

\[X_l = 2\pi fL\]

\[X_c = \frac{1}{2\pi fC}\]

<h3 id="阻抗的数学推导与复数表示">阻抗的数学推导与复数表示</h3>

<h4 id="时域与频域两种不同的视角">时域与频域：两种不同的视角</h4>

<p>在深入探讨阻抗的数学表示之前，我们需要理解两个重要的概念：时域和频域。这两个概念为我们提供了分析电路的两种不同视角，每种视角都有其独特的优势。</p>

<h5 id="什么是时域">什么是时域？</h5>

<p>时域是我们最熟悉的视角，它描述信号如何随时间变化。在时域中，我们观察的是电压、电流等物理量在每一时刻的值。就像我们用秒表记录运动物体的位置一样，时域分析关注的是”在时间t时刻，信号值是多少”。</p>

<p>在之前的章节中，我们已经接触了时域的表示方法。例如，交流电的电流可以表示为：</p>

\[I(t) = I_0 \sin(\omega t + \phi)\]

<p>这个公式告诉我们，在任何时刻 $t$，电流的值是多少。时域分析的优点是直观、易于理解，因为我们日常经验就是基于时间的。</p>

<p>然而，时域分析也有其局限性。当电路中包含电感和电容时，我们需要处理微分方程，这使得计算变得复杂。此外，时域分析难以直接看出电路对不同频率信号的响应特性。</p>

<h5 id="什么是频域">什么是频域？</h5>

<p>频域是另一种视角，它描述信号包含哪些频率成分，以及每个频率成分的强度和相位。如果说时域关注的是”信号在时间上如何变化”，那么频域关注的是”信号由哪些频率组成”。</p>

<p>频域分析就像是用棱镜将白光分解成彩虹中的各种颜色。白光本身看起来是单一的，但实际上它包含了多种不同频率（颜色）的光。同样，一个复杂的时域信号也可以被分解为多个不同频率的正弦波的叠加。</p>

<p>频域分析的数学基础是傅里叶变换，它可以将时域信号转换为频域表示。对于我们常见的正弦波交流电，其频域表示非常简单：只在特定频率f处有一个幅值。</p>

<h5 id="为什么需要频域分析">为什么需要频域分析？</h5>

<p>频域分析在交流电路分析中特别有用，原因如下：</p>

<ol>
  <li>
    <p><strong>简化计算</strong>：在频域中，微分运算变成了简单的乘法运算。例如，电感的电压-电流关系 $V_L = L \dfrac{\mathrm dI}{\mathrm dt}$ 在频域中变成了 $V = j\omega L I$，这是一个简单的代数方程。</p>
  </li>
  <li>
    <p><strong>直观理解频率响应</strong>：频域分析使我们能够直接看出电路对不同频率信号的响应。例如，我们可以一眼看出一个电路是低通滤波器、高通滤波器还是带通滤波器。</p>
  </li>
  <li>
    <p><strong>统一分析框架</strong>：频域分析为电阻、电感和电容提供了一个统一的分析框架，使我们能够用相同的方法处理这些不同的元件。</p>
  </li>
  <li>
    <p><strong>简化复杂信号分析</strong>：对于复杂的非正弦信号（如方波、三角波等），频域分析可以将它们分解为多个正弦波的叠加，然后分别分析每个频率成分通过电路的情况。</p>
  </li>
</ol>

<h5 id="时域与频域的对应关系">时域与频域的对应关系</h5>

<p>时域和频域是描述同一信号的两种不同方式，它们之间有着严格的数学对应关系。以下是几个常见信号的时域和频域对应关系：</p>

<table>
  <thead>
    <tr>
      <th>信号类型</th>
      <th>时域表示</th>
      <th>频域表示</th>
    </tr>
  </thead>
  <tbody>
    <tr>
      <td>直流信号</td>
      <td>常数</td>
      <td>只在频率0处有值</td>
    </tr>
    <tr>
      <td>正弦波</td>
      <td>$A\sin(2\pi ft + \phi)$</td>
      <td>只在频率f处有值，幅值为A，相位为$\phi$</td>
    </tr>
    <tr>
      <td>方波</td>
      <td>周期性方波</td>
      <td>基频和奇次谐波</td>
    </tr>
    <tr>
      <td>冲激信号</td>
      <td>极短时间内的极大值</td>
      <td>所有频率都有相同的幅值</td>
    </tr>
  </tbody>
</table>

<h5 id="从时域到频域的转变">从时域到频域的转变</h5>

<p>在交流电路分析中，我们经常需要在时域和频域之间转换。这种转换不仅是一种数学技巧，更是一种思维方式的转变。</p>

<p>例如，当我们分析一个RC低通滤波器时：</p>

<ul>
  <li>在时域中，我们需要解微分方程来找出输出电压随时间的变化</li>
  <li>在频域中，我们只需要计算传递函数 $H(f) = \dfrac{1}{1 + j2\pi fRC}$，就能直接看出电路对不同频率信号的响应</li>
</ul>

<p>这种从时域到频域的转变，使我们能够更深入地理解电路的行为特性，特别是对频率的选择性。</p>

<h5 id="频域分析的实际应用">频域分析的实际应用</h5>

<p>频域分析在许多领域都有广泛应用：</p>

<ol>
  <li><strong>音频处理</strong>：均衡器通过增强或衰减特定频率的信号来调整音质</li>
  <li><strong>无线通信</strong>：不同电台使用不同频率的信号进行广播</li>
  <li><strong>图像处理</strong>：图像可以通过傅里叶变换转换到频域进行处理</li>
  <li><strong>振动分析</strong>：机械系统的振动可以分解为不同频率的成分</li>
</ol>

<p>通过理解时域和频域的概念，我们为学习阻抗的复数表示打下了坚实的基础。阻抗本质上是一个频域概念，它描述了电路对不同频率信号的响应特性。在接下来的内容中，我们将看到如何利用频域分析来简化交流电路的计算，并获得更深刻的物理洞察。</p>

<h4 id="为什么需要复数一个简单的引入">为什么需要复数？一个简单的引入</h4>

<p>在之前的章节中，我们已经了解到交流电路中的电感和电容会导致电压和电流之间产生相位差。这种相位差使得交流电路的分析比直流电路复杂得多。为了简化这种复杂性，数学家们发现了复数这样一个非常强大的工具</p>

<h4 id="复数基础回顾">复数基础回顾</h4>

<p>在深入阻抗的复数表示之前，让我们先简单回顾一下复数的基本概念：</p>

<p>复数可以表示为 $a + jb$，其中：</p>

<ul>
  <li>$a$ 是实部</li>
  <li>$b$ 是虚部</li>
  <li>$j$ 是虚数单位，满足 $j^2 = -1$</li>
</ul>

<blockquote>
  <p>由于 $i$ 有时表示电流，电子学中常用 $j$ 表示虚数单位，即 $j^2 = -1$</p>
</blockquote>

<p>复数可以在平面上表示，横轴是实轴，纵轴是虚轴。这种表示方法帮助我们直观地理解复数的运算。</p>

<h4 id="欧拉公式">欧拉公式</h4>

<p>在交流电路分析中，我们面临一个挑战：如何简化微分方程的求解？18世纪瑞士数学家莱昂哈德·欧拉（Leonhard Euler）发现了一个被誉为”数学中最美公式”的欧拉公式：</p>

\[e^{j\theta} = \cos\theta + j\sin\theta \tag{4.1}\]

<p>这个公式实际上建立了一个非常重要的桥梁：它将指数函数与三角函数联系了起来，这意味着我们可以用指数函数来表示 $\sin$ 和 $\cos$</p>

\[\sin(\omega t) = \text{Im}[e^{j\omega t}] \tag{4.2}\]

\[\cos(\omega t) = \text{Re}[e^{j\omega t}] \tag{4.3}\]

<p>使用欧拉公式将复数变换至形式，微分运算将会变得非常简单：</p>

\[\frac{\mathrm d}{\mathrm dt}e^{j\omega t} = j\omega e^{j\omega t} \tag{4.4}\]

<h4 id="复数表示法与相量简化交流电路分析">复数表示法与相量：简化交流电路分析</h4>

<h5 id="什么是相量">什么是相量？</h5>

<p>在交流电路分析中，我们引入了相量（Phasor）的概念。相量可以理解为”旋转的箭头”，它是一个复数，表示正弦量的两个关键信息：幅值（大小）和相位（位置）。</p>

<p>相量的数学表示为：</p>

\[V = V_0 e^{j\phi_v} \tag{4.5}\]

\[I = I_0 e^{j\phi_i} \tag{4.5}\]

<p>其中 $V_0$ 和 $I_0$ 是幅值（箭头的长度），$\phi_v$ 和 $\phi_i$ 是初相位（箭头的初始角度）。</p>

<h5 id="相量如何简化电路分析">相量如何简化电路分析？</h5>

<p>使用相量表示法，我们可以将复杂的微分方程转换为简单的代数方程。让我们通过电感和电容的例子，一步一步地详细说明这个过程。</p>

<h6 id="电感的例子从微分方程到代数方程">电感的例子：从微分方程到代数方程</h6>

<p>在时域中，电感的电压-电流关系是一个微分方程：</p>

\[V_L(t) = L \frac{\mathrm dI_L(t)}{\mathrm dt} \tag{4.6}\]

<p>这个方程告诉我们，电感两端的电压与电流的变化率成正比。如果我们知道电流的具体形式，可以通过求导得到电压。</p>

<p>让我们假设通过电感的电流是一个正弦波：</p>

\[I_L(t) = I_0 \sin(\omega t + \phi_i) \tag{4.7}\]

<p>其中：</p>

<ul>
  <li>$I_0$ 是电流的幅值（最大值）</li>
  <li>$\omega$ 是角频率（$\omega = 2\pi f$，$f$ 是频率）</li>
  <li>$t$ 是时间</li>
  <li>$\phi_i$ 是初相位（决定电流在 $t=0$ 时的值）</li>
</ul>

<p>如果我们直接在时域中求解，需要将方程 $(4.7)$ 代入方程 $(4.6)$：</p>

\[V_L(t) = L \frac{\mathrm d}{\mathrm dt}[I_0 \sin(\omega t + \phi_i)]\]

<p>求导得到：</p>

\[V_L(t) = L \cdot I_0 \omega \cos(\omega t + \phi_i) \tag{4.8}\]

<p>利用三角恒等式 $\cos\theta = \sin(\theta + \dfrac{\pi}{2})$，我们可以将方程 $(4.8)$ 改写为：</p>

\[V_L(t) = L \cdot I_0 \omega \sin(\omega t + \phi_i + \frac{\pi}{2}) \tag{4.9}\]

<p>这个结果表明，电感两端的电压也是一个正弦波，但相位超前电流 $\dfrac{\pi}{2}$</p>

<p>现在，让我们看看如何使用相量表示法来简化这个过程。首先，我们需要将正弦函数表示为复指数函数的虚部。</p>

<p>根据欧拉公式：$e^{j\theta} = \cos\theta + j\sin\theta$，我们有：</p>

\[\sin\theta = \text{Im}[e^{j\theta}]\]

<p>因此，方程 $(4.7)$ 可以表示为：</p>

\[I_L(t) = I_0 \sin(\omega t + \phi_i) = \text{Im}[I_0 e^{j(\omega t + \phi_i)}] = \text{Im}[I_0 e^{j\phi_i} e^{j\omega t}] \tag{4.10}\]

<p>在相量表示法中，我们定义电流相量 $I$ 为：</p>

\[I = I_0 e^{j\phi_i} \tag{4.11}\]

<p>因此，方程 $(4.10)$ 可以写为：</p>

\[I_L(t) = \text{Im}[I e^{j\omega t}] \tag{4.12}\]

<p>现在，让我们对方程 $(4.12)$ 两边求导：</p>

\[\frac{\mathrm dI_L(t)}{\mathrm dt} = \frac{\mathrm d}{\mathrm dt}\text{Im}[I e^{j\omega t}] = \text{Im}\left[\frac{\mathrm d}{\mathrm dt}(I e^{j\omega t})\right]\]

<p>因为 $I$ 是一个常数（不随时间变化），所以：</p>

\[\frac{\mathrm dI_L(t)}{\mathrm dt} = \text{Im}[I \cdot \frac{\mathrm d}{\mathrm dt}e^{j\omega t}] = \text{Im}[I \cdot j\omega e^{j\omega t}] = \text{Im}[j\omega I e^{j\omega t}] \tag{4.13}\]

<p>将方程 $(4.13)$ 代入电感的电压方程 $(4.6)$：</p>

\[V_L(t) = L \cdot \text{Im}[j\omega I e^{j\omega t}] = \text{Im}[j\omega L I e^{j\omega t}] \tag{4.14}\]

<p>这表明电压的相量表示为：</p>

\[V = j\omega L I \tag{4.15}\]

<p>从方程 $(4.15)$，我们可以定义电感的阻抗为：</p>

\[Z_L = \frac{V}{I} = j\omega L \tag{4.16}\]

<p>这个结果告诉我们，在相量表示法中，电感的阻抗是一个纯虚数 $j\omega L$。现在让我们验证一下这个结果是否与直接求解的结果一致。从方程(10)和(6)，我们有：</p>

\[V = j\omega L I = j\omega L I_0 e^{j\phi_i} = \omega L I_0 e^{j(\phi_i + \frac{\pi}{2})} \tag{4.17}\]

<p>因为 $j = e^{j\frac{\pi}{2}}$，所以 $j\omega L I_0 e^{j\phi_i} = \omega L I_0 e^{j(\phi_i + \frac{\pi}{2})}$。</p>

<p>将方程 $(4.17)$ 转换回时域：</p>

\[V_L(t) = \text{Im}\left[V e^{j\omega t}\right] = \text{Im}\left[\omega L I_0 e^{j(\phi_i + \frac{\pi}{2})} e^{j\omega t}\right] = \omega L I_0 \sin\left(\omega t + \phi_i + \frac{\pi}{2}\right)\]

<p>这与我们直接求解得到的方程 $(4.9)$ 完全一致，验证了相量表示法的正确性。</p>

<h5 id="电容的例子">电容的例子</h5>

<p>在时域中，电容的电流-电压关系是：</p>

\[I_C(t) = C \frac{\mathrm dV_C(t)}{\mathrm dt} \tag{4.18}\]

<p>假设电容两端的电压是一个正弦波：</p>

\[V_C(t) = V_0 \sin(\omega t + \phi_v) \tag{4.19}\]

<p>将方程 $(4.19)$ 代入方程 $(4.18)$：</p>

\[I_C(t) = C \frac{\mathrm d}{\mathrm dt}[V_0 \sin(\omega t + \phi_v)] = C \cdot V_0 \omega \cos(\omega t + \phi_v)\]

<p>利用三角恒等式，可以改写为：</p>

\[I_C(t) = C \cdot V_0 \omega \sin\left(\omega t + \phi_v + \frac{\pi}{2}\right) \tag{4.20}\]

<p>这表明，电容中的电流超前电压 $\dfrac{\pi}{2}$。</p>

<p>将方程 $(4.19)$ 表示为复指数函数的虚部：</p>

\[V_C(t) = V_0 \sin(\omega t + \phi_v) = \text{Im}[V_0 e^{j(\omega t + \phi_v)}] = \text{Im}[V_0 e^{j\phi_v} e^{j\omega t}] \tag{4.21}\]

<p>定义电压相量 $V$ 为：</p>

\[V = V_0 e^{j\phi_v} \tag{4.22}\]

<p>因此，方程 $(4.20)$ 可以写为：</p>

\[V_C(t) = \text{Im}[V e^{j\omega t}] \tag{4.23}\]

<p>对方程 $(4.22)$ 两边求导：</p>

\[\frac{\mathrm dV_C(t)}{\mathrm dt} = \frac{\mathrm d}{\mathrm dt}\text{Im}\left[V e^{j\omega t}\right] = \text{Im}\left[\frac{\mathrm d}{\mathrm dt}(V e^{j\omega t})\right] = \text{Im}\left[V \cdot j\omega e^{j\omega t}\right] = \text{Im}[j\omega V e^{j\omega t}] \tag{4.24}\]

<p>将方程 $(4.24)$ 代入电容的电流方程 $(4.18)$：</p>

\[I_C(t) = C \cdot \text{Im}[j\omega V e^{j\omega t}] = \text{Im}[j\omega C V e^{j\omega t}] \tag{4.25}\]

<p>这表明电流的相量表示为：</p>

\[I = j\omega C V \tag{4.26}\]

<p>从方程 $(4.26)$，我们可以解出 $V$：</p>

\[V = \frac{1}{j\omega C} I \tag{4.27}\]

<p>因此，电容的阻抗为：</p>

\[Z_C = \frac{V}{I} = \frac{1}{j\omega C} \tag{4.28}\]

<p>我们可以进一步简化方程 $(4.28)$。首先，注意到：</p>

\[\frac{1}{j} = \frac{j}{j \cdot j} = \frac{j}{-1} = -j\]

<p>因此，电容的阻抗可以写为：</p>

\[Z_C = -j\frac{1}{\omega C} \tag{4.29}\]

<p>让我们验证一下这个结果是否与直接求解的结果一致。从方程 $(4.27)$ 和 $(4.22)$，我们有：</p>

\[I = j\omega C V = j\omega C V_0 e^{j\phi_v} = \omega C V_0 e^{j(\phi_v + \frac{\pi}{2})} \tag{4.30}\]

<p>将方程 $(4.20)$ 转换回时域：</p>

\[I_C(t) = \text{Im}[I e^{j\omega t}] = \text{Im}[\omega C V_0 e^{j(\phi_v + \frac{\pi}{2})} e^{j\omega t}] = \omega C V_0 \sin(\omega t + \phi_v + \frac{\pi}{2})\]

<p>这与我们直接求解得到的方程 $(4.20)$ 完全一致，验证了相量表示法的正确性。</p>

<h5 id="相量表示法的优势">相量表示法的优势</h5>

<p>通过相量表示法，我们将微分方程转换为代数方程，大大简化了计算过程，同时相量的旋转特性帮助我们直观地理解交流电的相位关系，这为电阻、电感和电容提供了一个统一的分析框架，也使他们可以在复平面上绘制电压和电流的关系</p>

<h3 id="阻抗的复数表示统一的电路描述">阻抗的复数表示：统一的电路描述</h3>

<h4 id="阻抗的复数形式">阻抗的复数形式</h4>

<p>现在，我们可以将前面学到的知识整合起来，给出阻抗的复数表示：</p>

\[Z = R + jX \tag{4.31}\]

<p>其中：</p>

<ul>
  <li>$R$ 是电阻（实部），代表能量耗散</li>
  <li>$X$ 是电抗（虚部），代表能量存储</li>
  <li>$j$ 是虚数单位</li>
</ul>

<p>这个复数形式完美地统一了电阻、电感和电容的特性：</p>

<ul>
  <li>对于纯电阻：$Z = R$（只有实部）</li>
  <li>对于纯电感：$Z = j\omega L$（只有虚部，为正）</li>
  <li>对于纯电容：$Z = -j\dfrac{1}{\omega C}$（只有虚部，为负）</li>
</ul>

<h4 id="阻抗的几何解释">阻抗的几何解释</h4>

<p>阻抗也可以在复平面上表示，这为我们提供了直观的几何理解：</p>

<pre><code class="language-mermaid">graph LR
    A[复平面] --&gt; B["实轴：电阻R"]
    A --&gt; C["虚轴：电抗X"]
    D[阻抗Z] --&gt; E["从原点到点 R,jX 的向量"]
</code></pre>

<p>阻抗的极坐标形式为：</p>

\[Z = |Z| e^{j\theta} \tag{4.32}\]

<p>其中：</p>

<ul>
  <li>$|Z| = \sqrt{R^2 + X^2}$ 是阻抗的模，表示电路对交流电的总阻碍作用</li>
  <li>$\theta = \arctan\left(\dfrac{X}{R}\right)$ 是阻抗的相位角，表示电压与电流之间的相位差</li>
</ul>

<p><strong>物理意义</strong>：</p>

<ul>
  <li>阻抗的模 $|Z|$ 类似于电阻的大小，但它不仅考虑了能量耗散，还考虑了能量存储效应。</li>
  <li>相位角 $\theta$ 告诉我们电压超前电流多少角度：
    <ul>
      <li>如果 $\theta &gt; 0$，电压超前电流（电路呈感性）</li>
      <li>如果 $\theta &lt; 0$，电压滞后电流（电路呈容性）</li>
      <li>如果 $\theta = 0$，电压与电流同相（电路呈纯阻性）</li>
    </ul>
  </li>
</ul>

<h4 id="从复数阻抗到欧姆定律">从复数阻抗到欧姆定律</h4>

<p>有了复数阻抗的概念，我们可以将欧姆定律推广到交流电路：</p>

\[V = Z \cdot I \tag{4.33}\]

<p>这个形式与直流电路中的欧姆定律 $V = R \cdot I$ 非常相似，但这里的 $V$ 和 $I$ 是相量，$Z$ 是复数阻抗。这种统一的形式大大简化了交流电路的分析！</p>

<h3 id="阻抗的串联与并联电路分析的实用工具">阻抗的串联与并联：电路分析的实用工具</h3>

<h4 id="阻抗的串联">阻抗的串联</h4>

<p>当多个阻抗串联时，总阻抗等于各阻抗之和。这与电阻的串联规则完全相同：</p>

<p><strong>串联</strong>：总阻抗等于各阻抗之和</p>

\[Z_{total} = Z_1 + Z_2 + \cdots + Z_n \tag{4.34}\]

<p><strong>例子</strong>：一个电阻 $R$ 和一个电感 $L$ 串联</p>

\[Z_{total} = R + j\omega L\]

<p>这个结果的物理意义是：电路中既有能量耗散（电阻部分），又有能量存储（电感部分），且电压超前电流。</p>

<h4 id="阻抗的并联">阻抗的并联</h4>

<p>当多个阻抗并联时，总阻抗的倒数等于各阻抗倒数之和。这也与电阻的并联规则相同：</p>

<p><strong>并联</strong>：总阻抗的倒数等于各阻抗倒数之和</p>

\[\frac{1}{Z_{total}} = \frac{1}{Z_1} + \frac{1}{Z_2} + \cdots + \frac{1}{Z_n} \tag{4.35}\]

<p><strong>例子</strong>：一个电阻 $R$ 和一个电容 $C$ 并联</p>

\[\frac{1}{Z_{total}} = \frac{1}{R} + \frac{1}{-j\frac{1}{\omega C}} = \frac{1}{R} + j\omega C\]

<p>因此，</p>

\[Z_{total} = \frac{1}{\frac{1}{R} + j\omega C} = \frac{R}{1 + j\omega RC}\]

<p>这个结果表明，并联RC电路的阻抗是一个复数，其实部和虚部都与频率有关。</p>

<h4 id="实际应用为什么这些规则很重要">实际应用：为什么这些规则很重要？</h4>

<p>阻抗的串联和并联规则在实际电路设计中非常重要，因为：</p>

<ol>
  <li><strong>电路分析</strong>：这些规则允许我们分析复杂的交流电路，将多个元件简化为一个等效阻抗。</li>
  <li><strong>滤波器设计</strong>：通过串联和并联不同的元件，可以设计出具有特定频率响应的滤波器。</li>
  <li><strong>阻抗匹配</strong>：在信号传输中，需要匹配源阻抗和负载阻抗，以最大化功率传输或最小化反射。</li>
  <li><strong>谐振电路</strong>：通过串联或并联电感和电容，可以创建在特定频率下具有特殊行为的谐振电路。</li>
</ol>

<p>这些规则与直流电路中的电阻串联和并联规则形式相同，这使得我们可以将直流电路的分析方法直接推广到交流电路，大大简化了学习过程！</p>

<h3 id="阻抗与导纳两种互补的视角">阻抗与导纳：两种互补的视角</h3>

<h4 id="什么是导纳">什么是导纳？</h4>

<p>导纳（Admittance）是阻抗的倒数，用 $Y$ 表示：</p>

\[Y = \frac{1}{Z} = G + jB \tag{4.36}\]

<p>其中：</p>

<ul>
  <li>$G$ 是电导（实部），是电阻的倒数</li>
  <li>$B$ 是电纳（虚部），是电抗的倒数</li>
</ul>

<p><strong>为什么需要导纳？</strong></p>

<p>导纳的概念为我们提供了分析电路的另一种视角。如果说阻抗描述了电路对电流的”阻碍”程度，那么导纳则描述了电路对电流的”导通”程度。</p>

<p>在某些情况下，特别是分析并联电路时，使用导纳比使用阻抗更加方便。因为并联导纳可以直接相加，就像并联电阻的电导可以直接相加一样。</p>

<h4 id="阻抗与导纳的转换">阻抗与导纳的转换</h4>

<p>让我们看看如何将阻抗转换为导纳：</p>

<p>给定阻抗 $Z = R + jX$，其导纳为：</p>

\[Y = \frac{1}{Z} = \frac{1}{R + jX}\]

<p>为了将分母中的虚数消除，我们可以将分子和分母同时乘以 $R - jX$：</p>

\[Y = \frac{R - jX}{(R + jX)(R - jX)} = \frac{R - jX}{R^2 + X^2} = \frac{R}{R^2 + X^2} - j\frac{X}{R^2 + X^2} \tag{4.37}\]

<p>因此，</p>

<p>\(G = \frac{R}{R^2 + X^2} \tag{4.38}\)
\(B = -\frac{X}{R^2 + X^2} \tag{4.39}\)</p>

<p><strong>例子</strong>：电感的导纳</p>

<p>电感的阻抗为 $Z_L = j\omega L$，其导纳为：</p>

\[Y_L = \frac{1}{j\omega L} = -j\frac{1}{\omega L}\]

<p>这表明电感的导纳是一个纯虚数，且为负值。</p>

<h4 id="导纳的实际应用">导纳的实际应用</h4>

<p>导纳的概念在以下几种情况下特别有用：</p>

<ol>
  <li>
    <p><strong>并联电路分析</strong>：当多个元件并联时，总导纳等于各导纳之和：
\(Y_{total} = Y_1 + Y_2 + \cdots + Y_n \tag{4.40}\)
这比计算并联阻抗要简单得多。</p>
  </li>
  <li>
    <p><strong>节点分析法</strong>：在电路理论中，节点分析法使用导纳而不是阻抗，可以简化方程的建立。</p>
  </li>
  <li>
    <p><strong>传输线理论</strong>：在分析高频信号传输时，导纳是一个基本概念。</p>
  </li>
  <li>
    <p><strong>网络分析</strong>：在分析复杂网络时，导纳矩阵比阻抗矩阵更容易处理。</p>
  </li>
</ol>

<h4 id="阻抗与导纳的对比">阻抗与导纳的对比</h4>

<table>
  <thead>
    <tr>
      <th>特性</th>
      <th>阻抗 $Z$</th>
      <th>导纳 $Y$</th>
    </tr>
  </thead>
  <tbody>
    <tr>
      <td>定义</td>
      <td>电压与电流之比</td>
      <td>电流与电压之比</td>
    </tr>
    <tr>
      <td>单位</td>
      <td>欧姆 ($\Omega$)</td>
      <td>西门子 (S)</td>
    </tr>
    <tr>
      <td>串联</td>
      <td>直接相加</td>
      <td>需要转换</td>
    </tr>
    <tr>
      <td>并联</td>
      <td>需要转换</td>
      <td>直接相加</td>
    </tr>
    <tr>
      <td>物理意义</td>
      <td>对电流的阻碍</td>
      <td>对电流的导通</td>
    </tr>
  </tbody>
</table>

<p>阻抗和导纳是描述电路特性的两种互补方法。在实际问题中，我们可以根据具体情况选择使用阻抗还是导纳，以简化计算和分析过程。</p>

<h3 id="阻抗的物理意义从数学到现实">阻抗的物理意义：从数学到现实</h3>

<p>阻抗的复数表示不仅仅是一个抽象的数学工具，它有着深刻的物理意义。让我们从不同角度来理解阻抗的物理含义。</p>

<h4 id="能量视角耗散与存储">能量视角：耗散与存储</h4>

<p>从能量的角度看，阻抗的复数形式完美地描述了电路中能量的两种不同命运：</p>

<ol>
  <li><strong>实部（电阻）</strong>：代表能量耗散
    <ul>
      <li>当电流通过电阻时，电能被不可逆地转化为热能</li>
      <li>这种能量转化是不可逆的，符合热力学第二定律</li>
      <li>电阻越大，能量耗散越快</li>
    </ul>
  </li>
  <li><strong>虚部（电抗）</strong>：代表能量存储
    <ul>
      <li>在电感中，能量以磁场形式存储</li>
      <li>在电容中，能量以电场形式存储</li>
      <li>这种能量存储是可逆的，可以被完全释放回电路</li>
      <li>电抗的大小决定了能量存储的效率</li>
    </ul>
  </li>
</ol>

<h4 id="时间视角即时与延迟">时间视角：即时与延迟</h4>

<p>从时间的角度看，阻抗描述了电压和电流之间的时间关系：</p>

<ol>
  <li><strong>纯电阻电路</strong>：电压和电流同步变化，没有时间延迟</li>
  <li><strong>电感电路</strong>：电压变化超前于电流变化，电感”抵抗”电流的变化</li>
  <li><strong>电容电路</strong>：电流变化超前于电压变化，电容”抵抗”电压的变化</li>
</ol>

<h4 id="频率视角通与阻">频率视角：通与阻</h4>

<p>从频率的角度看，阻抗描述了电路对不同频率信号的不同响应：</p>

<ol>
  <li><strong>电阻</strong>：对所有频率的信号响应相同</li>
  <li><strong>电感</strong>：对高频信号阻碍大，对低频信号阻碍小</li>
  <li><strong>电容</strong>：对低频信号阻碍大，对高频信号阻碍小</li>
</ol>

<p>这种频率选择性是许多电子电路（如滤波器、谐振电路）的基础。</p>

<h4 id="几何视角向量与旋转">几何视角：向量与旋转</h4>

<p>从几何的角度看，阻抗可以在复平面上表示为一个向量：</p>

<ol>
  <li><strong>模</strong>：向量的长度，表示电路对交流电的总阻碍作用</li>
  <li><strong>相位角</strong>：向量与实轴的夹角，表示电压与电流之间的相位关系</li>
</ol>

<h4 id="实用视角简化与统一">实用视角：简化与统一</h4>

<p>从实用的角度看，阻抗的复数表示为我们提供了一个统一的分析框架：</p>

<ol>
  <li><strong>统一描述</strong>：将电阻、电感和电容统一在一个数学框架下</li>
  <li><strong>简化计算</strong>：将微分方程转换为代数方程，大大简化了计算过程</li>
  <li><strong>直观理解</strong>：通过复数平面上的几何表示，提供了直观的理解方式</li>
  <li><strong>广泛应用</strong>：适用于从简单电路到复杂网络的各种情况</li>
</ol>

<h2 id="5-阻抗的实际应用">5. 阻抗的实际应用</h2>

<h3 id="滤波电路频率选择性">滤波电路：频率选择性</h3>

<p>阻抗的频率依赖性是许多电子电路的基础。滤波电路利用不同频率下阻抗的变化，实现对特定频率信号的选择性通过或阻断。</p>

<h4 id="低通滤波器low-pass-filter">低通滤波器（Low-pass Filter）</h4>

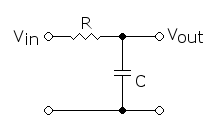
<p>一个简单的RC低通滤波器由一个电阻和一个电容串联组成：</p>

<div style="text-align: center;">
    <img src="/assets/2025-08-07-a-brief-introduction-on-impedance/Low_pass_filter.png" alt="LC Circuit" style="max-width: 400px; max-height: 400px;" />
</div>

<blockquote>
  <p>Schematic of a simple parallel LC circuit, <a href="https://commons.wikimedia.org/wiki/File:Low_pass_filter.png">from wikipedia</a></p>
</blockquote>

<p>该电路的传递函数为：</p>

\[H(f) = \frac{V_{out}}{V_{in}} = \frac{1}{1 + j2\pi fRC} \tag{5.1}\]

<p>当频率 $f$ 很低时，电容的容抗 $X_C = \dfrac{1}{2\pi fC}$ 很大，相当于开路，信号几乎无衰减地通过。当频率 $f$ 很高时，容抗很小，相当于短路，信号被大幅衰减。</p>

<h4 id="高通滤波器high-pass-filter">高通滤波器（High-pass Filter）</h4>

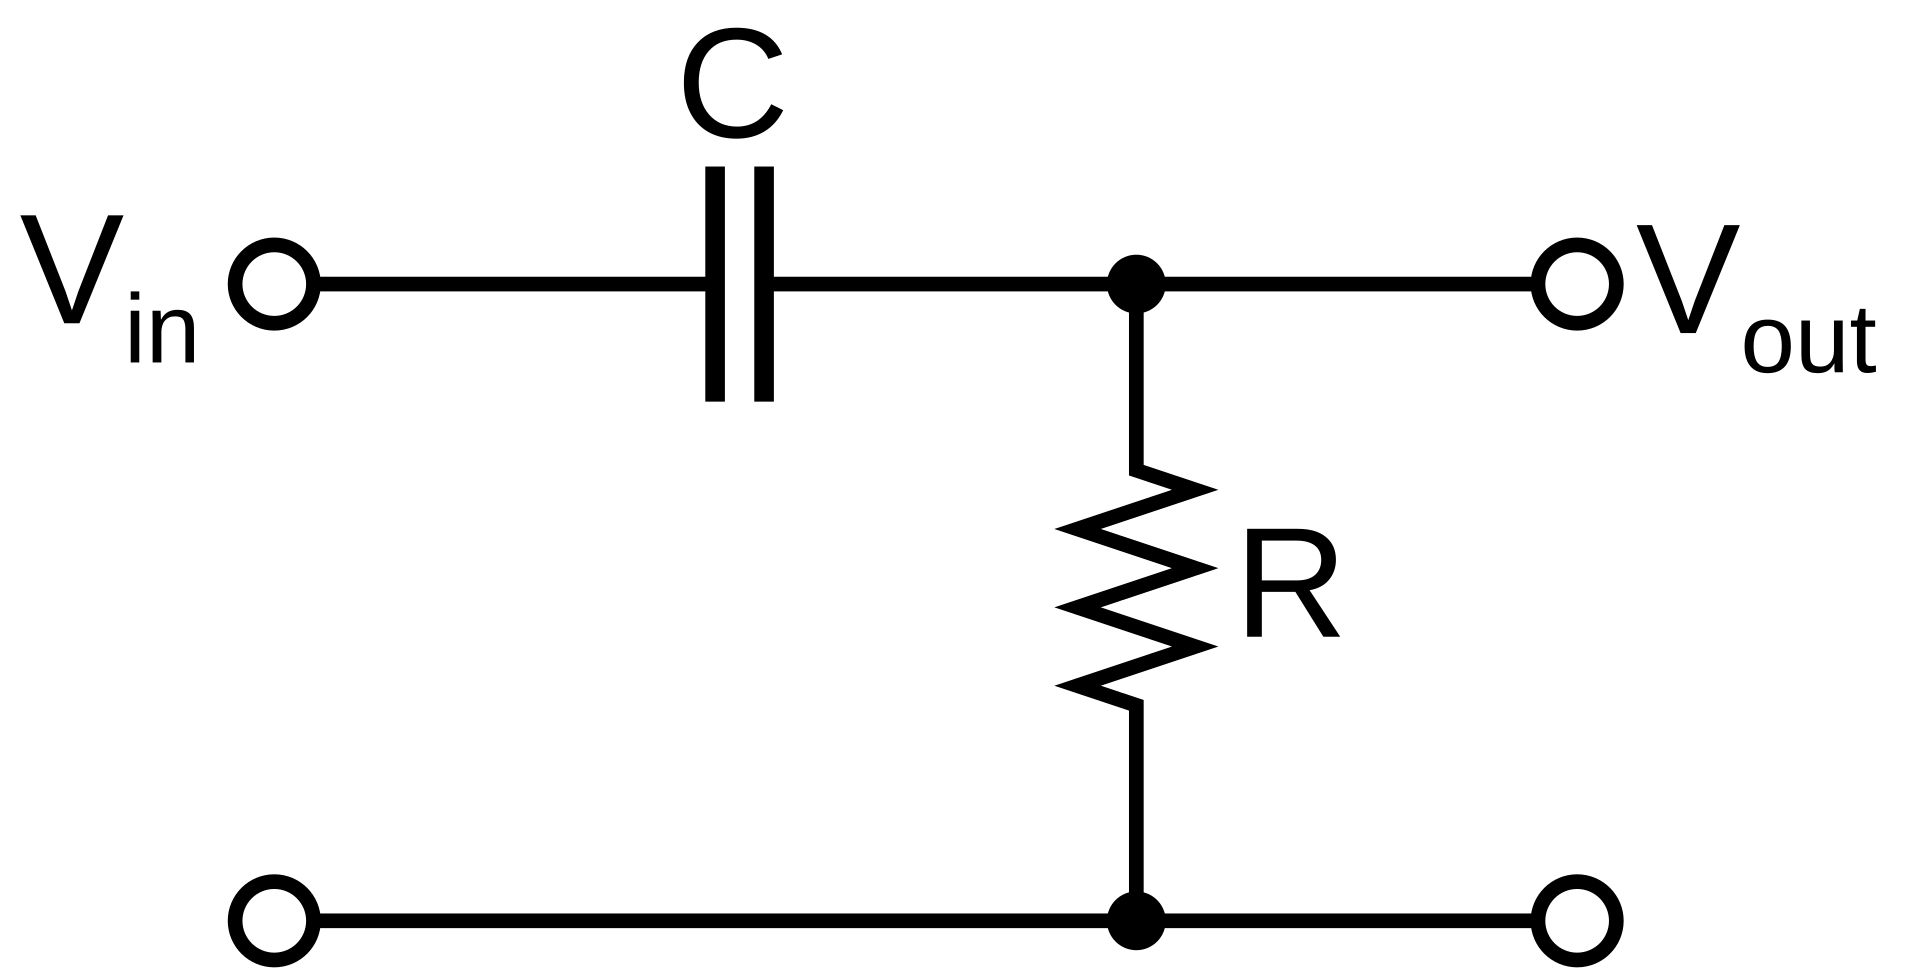
<p>类似地，一个简单的高通滤波器可以通过交换电阻和电容的位置来实现：</p>

<div style="text-align: center;">
    <img src="/assets/2025-08-07-a-brief-introduction-on-impedance/CR_high_pass_filter.svg.png" alt="High Pass Filter" style="max-width: 300px; max-height: 300px;" />
</div>

<blockquote>
  <p>A high-pass filter, <a href="https://commons.wikimedia.org/wiki/File:CR_high_pass_filter.svg">from wikipedia</a></p>
</blockquote>

<p>该电路的传递函数为：</p>

\[H(f) = \frac{V_{out}}{V_{in}} = \frac{j2\pi fRC}{1 + j2\pi fRC} \tag{5.2}\]

<p>这种滤波器允许高频信号通过，而阻断低频信号。</p>

<h3 id="谐振电路resonantlc-circuit能量交换的和谐">谐振电路（Resonant/LC Circuit）：能量交换的和谐</h3>

<p>当电感和电容组合在一起时，会发生谐振现象。在谐振频率下，感抗和容抗相互抵消，电路呈现纯电阻特性。</p>

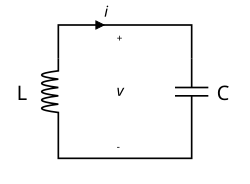
<h4 id="串联谐振电路">串联谐振电路</h4>

<div style="text-align: center;">
    <img src="/assets/2025-08-07-a-brief-introduction-on-impedance/LC_parallel_simple.svg.png" alt="LC Circuit" style="max-width: 200px; max-height: 200px;" />
</div>

<blockquote>
  <p>Schematic of a simple parallel LC circuit, <a href="https://commons.wikimedia.org/wiki/File:LC_parallel_simple.svg">from wikipedia</a></p>
</blockquote>

<p>串联谐振电路的总阻抗为：</p>

\[Z = R + j\left(\omega L - \frac{1}{\omega C}\right) \tag{5.3}\]

<p>谐振频率 $\omega_0$ 满足 $\omega_0 L = \frac{1}{\omega_0 C}$，即：</p>

\[f_0 = \frac{1}{2\pi\sqrt{LC}} \tag{5.4}\]

<p>在谐振频率下，阻抗达到最小值 $Z = R$，电流达到最大值。</p>

<h3 id="阻抗匹配最大功率传输">阻抗匹配：最大功率传输</h3>

<p>在电子系统中，阻抗匹配是一个重要概念。根据最大功率传输定理，当负载阻抗等于源阻抗的共轭复数时，负载可以获得最大功率。</p>

<p>对于纯电阻电路，这意味着负载电阻应等于源电阻。对于含有电抗的电路，负载阻抗应为源阻抗的共轭复数：</p>

\[Z_L = Z_S^*\]

<p>这一原理在音频系统、射频电路和天线设计中都有重要应用。</p>

<h3 id="实际应用">实际应用</h3>

<h4 id="音频系统中的分频器">音频系统中的分频器</h4>

<p>在音响系统中，分频器利用阻抗的频率特性，将音频信号分配到不同的扬声器：</p>

<ul>
  <li>低音扬声器：通过低通滤波器，接收低频信号</li>
  <li>高音扬声器：通过高通滤波器，接收高频信号</li>
  <li>中音扬声器：通过带通滤波器，接收中频信号</li>
</ul>

<h4 id="无线通信中的匹配网络">无线通信中的匹配网络</h4>

<p>在无线通信系统中，天线阻抗通常为50Ω或75Ω，而放大器输出阻抗可能不同。为了实现最大功率传输，需要设计匹配网络，使天线阻抗与放大器输出阻抗匹配。</p>

<h4 id="电力系统中的功率因数校正">电力系统中的功率因数校正</h4>

<p>在电力系统中，感性负载（如电动机）会导致电流滞后于电压，降低功率因数。通过并联适当的电容，可以补偿相位差，提高功率因数，减少能源浪费。</p>

<p>通过这些实际应用，我们可以看到阻抗概念不仅是一个抽象的物理概念，也是现代电子技术和电力系统的基础。</p>

<h2 id="总结">总结</h2>

<h3 id="笔记回顾">笔记回顾</h3>

<p>在这篇笔记中，我们经历了一个从简单到复杂、从具体到抽象的学习过程：</p>

<ol>
  <li>
    <p><strong>从电阻开始</strong>：我们首先回顾了电阻的概念，了解了它的历史起源、物理本质和影响因素。电阻作为电路中最基本的元件，为我们理解能量耗散提供了基础。</p>
  </li>
  <li>
    <p><strong>进入交流世界</strong>：接着，我们探讨了交流电与直流电的区别，认识到交流电路中出现的特殊现象，如电磁感应、电容效应等，这些现象使得简单的欧姆定律不再适用。</p>
  </li>
  <li>
    <p><strong>认识特殊元件</strong>：我们深入研究了电感和电容的物理原理，了解了它们在交流电路中的特殊行为，特别是它们与电阻的根本区别——电感和电容阻碍的是电流和电压的变化，而不是电流和电压本身。</p>
  </li>
  <li>
    <p><strong>引入阻抗概念</strong>：通过将电阻、感抗和容抗统一在一个复数框架下，我们引入了阻抗的概念。阻抗不仅包含了电路对交流电的阻碍作用，还包含了电压与电流之间的相位关系。</p>
  </li>
  <li>
    <p><strong>数学工具的应用</strong>：我们学习了如何使用复数和相量来简化交流电路的分析，将微分方程转换为代数方程，大大简化了计算过程。</p>
  </li>
  <li>
    <p><strong>实践验证理论</strong>：最后，我们通过实际应用案例和实验演示，验证了阻抗理论，并了解了它在现代电子技术中的广泛应用。</p>
  </li>
</ol>

<h3 id="阻抗概念的深层意义">阻抗概念的深层意义</h3>

<p>阻抗概念的重要性不仅在于它的实用性，还在于它体现了物理学中的一种重要思想：<strong>统一与简化</strong>。通过引入复数表示，我们能够将原本复杂的交流电路问题简化为类似于直流电路的问题，这种思想在物理学的发展史上反复出现。</p>

<p>阻抗概念也展示了物理学中<strong>模型构建</strong>的过程。面对复杂的自然现象，我们不是直接陷入细节，而是构建适当的数学模型，抓住主要矛盾，忽略次要因素，从而获得对问题的深入理解。</p>

<hr />
<p> </p>

<p>由我和 GLM-4.5 合作整理于2025年8月7日</p>]]></content><author><name></name></author><category term="Physics" /><category term="Electrical Engineering" /><summary type="html"><![CDATA[]]></summary></entry><entry><title type="html">Why Simple Harmonic Motion Can Be Modelled by a Reference Circle</title><link href="https://anson2251.github.io/physics/mathematics/2025/01/18/why-simple-harmonic-motion-can-be-modelled-by-a-reference-circle.html" rel="alternate" type="text/html" title="Why Simple Harmonic Motion Can Be Modelled by a Reference Circle" /><published>2025-01-18T00:00:00+00:00</published><updated>2025-01-18T00:00:00+00:00</updated><id>https://anson2251.github.io/physics/mathematics/2025/01/18/why-simple-harmonic-motion-can-be-modelled-by-a-reference-circle</id><content type="html" xml:base="https://anson2251.github.io/physics/mathematics/2025/01/18/why-simple-harmonic-motion-can-be-modelled-by-a-reference-circle.html"><![CDATA[<style>
*:not(code, .katex *) {
    font-family: 'Segoe UI', Tahoma, Geneva, Verdana, sans-serif;
}

p {
    overflow: auto;
}

code, span:is(.highlight *) {
    font-family: 'Consola', 'Menlo', 'Courier New', Courier, monospace;
    border-radius: 4px;
    background-color: #f0f0f0 !important;
}

.highlight:is(pre)  {
    background-color: #f0f0f0 !important;
    box-shadow: inset 0 1px 1px rgba(255, 255, 2555, 0.3); 
    border-radius: 4px;

}

.highlight:is(div) {
    margin: 4px 8px;
    border-radius: 4px;

}
</style>

<link href="/assets/fonts/barlow.css" rel="stylesheet" />

<link rel="stylesheet" href="https://cdn.jsdelivr.net/npm/katex@0.18.6/dist/katex.min.css" integrity="sha384-M59ezskvvpvT+a+C1x088YJ3DVmK+wZdX0UkVKalOI4Qi5Nwv0WrvpqHcfa2HQqB" crossorigin="anonymous" />

<!-- The loading of KaTeX is deferred to speed up page rendering -->
<script defer="" src="https://cdn.jsdelivr.net/npm/katex@0.18.6/dist/katex.min.js" integrity="sha384-7jGyG5zFwmEamqNWdCbpsPn+GTWEis3lnV7X/jXHyhFpJG7ExABLyMapabg8F4+p" crossorigin="anonymous"></script>

<!-- To automatically render math in text elements, include the auto-render extension: -->
<script defer="" src="https://cdn.jsdelivr.net/npm/katex@0.18.6/dist/contrib/auto-render.min.js" integrity="sha384-bjyGPfbij8/NDKJhSGZNP/khQVgtHUE5exjm4Ydllo42FwIgYsdLO2lXGmRBf5Mz" crossorigin="anonymous" onload="renderMathInElement(document.body, {
      delimiters: [
        {left: '$$', right: '$$', display: true},   // Block math
        {left: '$', right: '$', display: false},    // Inline math (Enabled manually)
        {left: '\\(', right: '\\)', display: false},
        {left: '\\[', right: '\\]', display: true}
      ],
      throwOnError : false
    });"></script>

<h2 id="introduction">Introduction</h2>

<p>During a physics lesson I was introduced to the concept of Simple Harmonic Motion (SHM), which can be modelled using a reference circle. At first I was puzzled: why can SHM be represented by a circle? Is it an assumption or a coincidence? To understand this in a more “sensible” way, I decided to derive the relationship between SHM and the reference circle mathematically.</p>

<h2 id="1-what-is-shm-simple-harmonic-motion">1. What is SHM (Simple Harmonic Motion)</h2>

<p>SHM is the motion of an object about a fixed point such that its acceleration \(a\) is proportional to its displacement \(x\) from the fixed point, and is directed towards the point. In other words, SHM follows the following equation:</p>

\[a = -C x\]

<p>where \(C\) is a positive constant.</p>

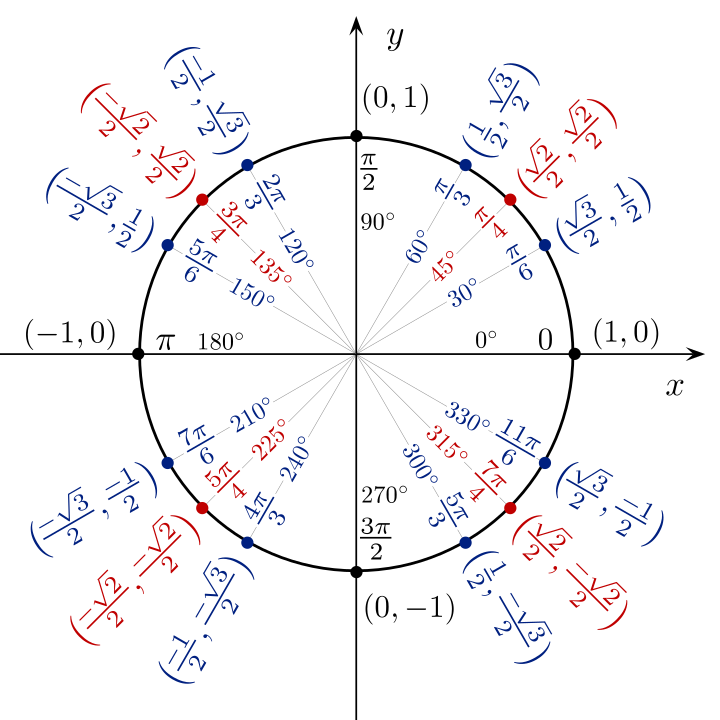
<p>How to model this motion? A reference circle can be used.</p>

<div style="text-align: center;">
    <img src="/assets/2025-01-18-why-simple-harmonic-motion-can-be-modelled-by-a-reference-circle/Unit_circle_angles_color.svg" alt="A reference circle" style="max-width: 400px; max-height: 400px;" />
</div>

<blockquote>
  <p>A reference circle. By <a href="//commons.wikimedia.org/w/index.php?title=User:Jim.belk&amp;action=edit&amp;redlink=1">Jim.belk</a> - <em>Own work</em>, Public Domain, <a href="https://commons.wikimedia.org/w/index.php?curid=12062595">Link</a></p>
</blockquote>

<p>By projecting the motion of a particle moving in a circle onto a diameter, we have:</p>

\[\begin{align}
x &amp;= x_0\sin(\omega t+\theta) \\
v &amp;= \dfrac{\mathrm{d}{x}}{\mathrm{d}{t}}=x_0\omega \cos(\omega t+\theta) \\
a &amp;= \dfrac{\mathrm{d}{v}}{\mathrm{d}{t}}=-x_0\omega^2 \sin(\omega t+\theta) = -\omega^2 x
\end{align}\]

<p>Where \(\omega\) is the angular speed of the reference circle, and \(\theta\) is the initial phase angle. The radius of the circle corresponds to the amplitude of the SHM.</p>

<p>But wait, why can we model SHM with a reference circle? In order to answer this question, we need to dive into the mathematics behind it.</p>

<h2 id="2-some-mathematical-derivation">2. Some Mathematical Derivation</h2>

<p>In the following equation, we are going to ignore frictions and other external forces.</p>

<p>Since we were introduced to simple harmonic motion from the motion of a spring. Let’s start from the Hooke’s Law, which states the force \(F\) exerted by a spring is proportional to the displacement \(x\) from its equilibrium position:</p>

\[F=-kx\]

<p>According to Newton’s Second Law, we have:</p>

\[F=ma\]

<p>Additionally, due to the definition of acceleration, we have:</p>

\[a=\dfrac{\mathrm{d}^2}{\mathrm{d}t^2}x\]

<p>Let’s combine these equations:</p>

\[\begin{align}
ma &amp;= -kx \\
m\dfrac{\mathrm{d}^2x}{\mathrm{d}t^2} &amp;= -kx \\
\dfrac{\mathrm{d}^2x}{\mathrm{d}t^2} &amp;= -\dfrac{k}{m}x \\
\dfrac{\mathrm{d}^2x}{\mathrm{d}t^2} + \dfrac{k}{m}x &amp;= 0
\end{align}\]

<p>Well, we have obtained a second-order differential equation. To solve it, we can assume a solution of the form:</p>

\[x(t) = e^{rt}\]

<p>Why we use this form? Because exponential functions \(e^x\) have the property that their derivatives are proportional to themselves, which makes them suitable for solving differential equations. Let’s substitute this into our differential equation:</p>

<p>Now we substitue \(x(t) = e^{rt}\) into the differential equation:</p>

\[\begin{align}
r^2 e^{rt} + \frac{k}{m} e^{rt} &amp;= 0
\end{align}\]

<p>By factoring out \(e^{rt}\), we can obtain the characteristic equation, since \(e^{rt} \neq 0\):</p>

\[\begin{align}
e^{rt}\left(r^2 + \frac{k}{m}\right) &amp;= 0 \\
r^2 + \frac{k}{m} &amp;= 0
\end{align}\]

<p>Now, we can solve the characteristic equation:</p>

\[\begin{align}
r^2 &amp;= -\frac{k}{m} \\
r &amp;= \pm i \sqrt{\frac{k}{m}}
\end{align}\]

<p>Finally, since the roots of the characteristic equation are complex, the general solution to the differential equation is:</p>

\[\begin{align}
x(t) &amp;= C_1 e^{i \sqrt{\frac{k}{m}} t} + C_2 e^{-i \sqrt{\frac{k}{m}} t}
\end{align}\]

<p>Where \(C_1\) and \(C_2\) are arbitrary constants determined by initial conditions.</p>

<p>Then, according to Euler’s formula: \(e^{i\theta} = \cos \theta + i \sin \theta\), we can rewrite the general solution as:</p>

\[\begin{align}
x(t) &amp;= C_1 \left(\cos\left(\sqrt{\frac{k}{m}} t\right) + i\sin\left(\sqrt{\frac{k}{m}} t\right)\right) \\&amp; \quad + C_2 \left(\cos\left(\sqrt{\frac{k}{m}} t\right) - i\sin\left(\sqrt{\frac{k}{m}} t\right)\right) \notag\\
x(t) &amp;= (C_1 + C_2)\cos\left(\sqrt{\frac{k}{m}} t\right) + i(C_1 - C_2)\sin\left(\sqrt{\frac{k}{m}} t\right)
\end{align}\]

<p>Let \(A = C_1 + C_2\) and \(B = i(C_1 - C_2)\), so:</p>

\[x(t) = A\cos\left(\sqrt{\frac{k}{m}} t\right) + B\sin\left(\sqrt{\frac{k}{m}} t\right)\]

<p>By using the trigonometric identity (compound angle formula) we used in Pure Mathmatics 3:
<!-- add more details --></p>

\[\begin{align}
A\cos\left(\sqrt{\frac{k}{m}} t\right) + B\sin\left(\sqrt{\frac{k}{m}} t\right) = R\sin\left(\sqrt{\frac{k}{m}} t + \theta \right)
\end{align}\]

<p>where:</p>

\[R = \sqrt{A^2 + B^2} \quad \text{and} \quad \theta = \tan^{-1}\left(\frac{A}{B}\right).\]

<p>We are very close to the final solution. Let’s define \(\omega = \sqrt{\frac{k}{m}}\) and \(x_0 = R\), so:</p>

\[x(t) = x_0\sin(\omega t + \theta)\]

<p>It is obvious that this equation is the same as the equation of the projection of the reference circle.</p>

<p>By getting the second derivative of \(x(t)\), we can get the expression of \(a(t)\):</p>

\[\begin{align}
a(t) &amp;= \frac{\mathrm{d^2} v}{\mathrm{d}t^2} = -x_0\omega^2\sin(\omega t + \theta)
\end{align}\]

<p>Now, we can combine two equations to get the relationship bewteen \(a(t)\) and \(x(t)\):</p>

\[\begin{align}
a(t) &amp;= -\omega^2 (x_0\sin(\omega t + \theta)) \\
a(t) &amp;= -\omega^2 x(t)
\end{align}\]

<p>In this way, we have proved that the acceleration of the mass is proportional to its displacement from the equilibrium position and is always directed towards the equilibrium position. This is the defining characteristic of simple harmonic motion.</p>

\[\text{Q.E.D.}\]]]></content><author><name></name></author><category term="physics" /><category term="mathematics" /><summary type="html"><![CDATA[]]></summary></entry><entry><title type="html">Protecting Secrets: Credential Handling for Open-Source Projects</title><link href="https://anson2251.github.io/credentials/programming/2024/07/27/development-credential-handling-solution.html" rel="alternate" type="text/html" title="Protecting Secrets: Credential Handling for Open-Source Projects" /><published>2024-07-27T14:30:00+00:00</published><updated>2024-07-27T14:30:00+00:00</updated><id>https://anson2251.github.io/credentials/programming/2024/07/27/development-credential-handling-solution</id><content type="html" xml:base="https://anson2251.github.io/credentials/programming/2024/07/27/development-credential-handling-solution.html"><![CDATA[<style>
*:not(code, .katex *) {
    font-family: 'Segoe UI', Tahoma, Geneva, Verdana, sans-serif;
}

p {
    overflow: auto;
}

code, span:is(.highlight *) {
    font-family: 'Consola', 'Menlo', 'Courier New', Courier, monospace;
    border-radius: 4px;
    background-color: #f0f0f0 !important;
}

.highlight:is(pre)  {
    background-color: #f0f0f0 !important;
    box-shadow: inset 0 1px 1px rgba(255, 255, 2555, 0.3); 
    border-radius: 4px;

}

.highlight:is(div) {
    margin: 4px 8px;
    border-radius: 4px;

}
</style>

<link href="/assets/fonts/barlow.css" rel="stylesheet" />

<h2 id="introduction">Introduction</h2>

<p>This blog aims to document an effective method I recently developed for managing credential API keys in the open-source project <a href="https://github.com/Anson2251/trackmaker">Trackmaker</a> which I have been developing for a long time, and the journey I came up with this method. The method uses a private credential configuration file to store the credentials or passes the credentials via environment variables. The first approach simplifies debugging, while the second approach enables GitHub Actions to automatically build GitHub Pages without the need to upload a private credential configuration file.</p>

<h2 id="how-i-came-up-with-this-idea-and-made-a-framework">How I Came Up with This Idea and Made a Framework</h2>

<p>The consideration for protecting credentials dates back to when I signed up for the <a href="https://www.bingmapsportal.com/">Bing Maps Dev Centre</a> and obtained a basic key. According to the terms of use, this credential key must not be exposed to the public. This posed a challenging task: ensuring the program can read the key without including any key-related information in the publicly accessible code on GitHub.</p>

<p>To address this problem, I explored various solutions over several months. To evaluate the quality of these solutions, I considered the following factors:</p>

<ul class="task-list">
  <li class="task-list-item"><input type="checkbox" class="task-list-item-checkbox" disabled="disabled" /><strong>Can avoid the credentials from being exposed via the source code.</strong>
    <ul>
      <li>The source code can be accessed by the public.</li>
    </ul>
  </li>
  <li class="task-list-item"><input type="checkbox" class="task-list-item-checkbox" disabled="disabled" /><strong>Can avoid the credentials from being exposed via the built product.</strong>
    <ul>
      <li>The credentials may be obtained from reverse engineering.</li>
    </ul>
  </li>
  <li class="task-list-item"><input type="checkbox" class="task-list-item-checkbox" disabled="disabled" /><strong>Can support the source code to be built without uploading the credentials.</strong>
    <ul>
      <li>The project should pass compilation even if the credentials are not included, making it fully open to the public.</li>
    </ul>
  </li>
  <li class="task-list-item"><input type="checkbox" class="task-list-item-checkbox" disabled="disabled" /><strong>Can cooperate with GitHub Pages &amp; Actions to build the page automatically.</strong></li>
  <li class="task-list-item"><input type="checkbox" class="task-list-item-checkbox" disabled="disabled" /><strong>New credentials can be added easily.</strong></li>
</ul>

<h3 id="gitignore">.gitignore</h3>

<p>The preliminary method I came up with was straightforward: separate the storage of the credential keys and add the file containing the keys to <code class="language-plaintext highlighter-rouge">.gitignore</code>.</p>

<ul class="task-list">
  <li class="task-list-item"><input type="checkbox" class="task-list-item-checkbox" disabled="disabled" checked="checked" />Can avoid the credentials from being exposed via the source code.</li>
  <li class="task-list-item"><input type="checkbox" class="task-list-item-checkbox" disabled="disabled" />Can avoid the credentials from being exposed via the built product.</li>
  <li class="task-list-item"><input type="checkbox" class="task-list-item-checkbox" disabled="disabled" />Can support the source code to be built without uploading the credentials.</li>
  <li class="task-list-item"><input type="checkbox" class="task-list-item-checkbox" disabled="disabled" />Can cooperate with GitHub Pages &amp; Actions to build the page automatically.</li>
  <li class="task-list-item"><input type="checkbox" class="task-list-item-checkbox" disabled="disabled" />New credentials can be added easily.</li>
</ul>

<h3 id="encryption-of-credentials">Encryption of Credentials</h3>

<p>To prevent credentials from being obtained through reverse engineering, I applied a private encryption method. I designed an algorithm to achieve this.</p>

<ul class="task-list">
  <li class="task-list-item"><input type="checkbox" class="task-list-item-checkbox" disabled="disabled" checked="checked" />Can avoid the credentials from being exposed via the source code.</li>
  <li class="task-list-item"><input type="checkbox" class="task-list-item-checkbox" disabled="disabled" checked="checked" />Can avoid the credentials from being exposed via the built product.</li>
  <li class="task-list-item"><input type="checkbox" class="task-list-item-checkbox" disabled="disabled" />Can support the source code to be built without uploading the credentials.</li>
  <li class="task-list-item"><input type="checkbox" class="task-list-item-checkbox" disabled="disabled" />Can cooperate with GitHub Pages &amp; Actions to build the page automatically.</li>
  <li class="task-list-item"><input type="checkbox" class="task-list-item-checkbox" disabled="disabled" />New credentials can be added easily.</li>
</ul>

<h3 id="configuration-file-environment-variables--vite">Configuration File, Environment Variables, &amp; Vite</h3>

<p>As I started configuring GitHub Pages to preview the built page, the need to build with the public source code emerged. Credentials can be passed using <code class="language-plaintext highlighter-rouge">secrets</code>, where the credentials can be stored and accessed when building the page. I also found a useful configuration in Vite, a bundler I used, called <a href="https://vitejs.dev/config/shared-options.html#define"><code class="language-plaintext highlighter-rouge">define</code></a>, which defines global constant replacements. With this option, I can replace constants with credentials during the build. To facilitate debugging, I modified the <code class="language-plaintext highlighter-rouge">vite.config.ts</code> to read credentials from a file and environment variables for GitHub Pages.</p>

<p>Additionally, using <code class="language-plaintext highlighter-rouge">JavaScript Obfuscator</code> can encrypt the credentials, ensuring they do not exist in plaintext form in the production build.</p>

<ul class="task-list">
  <li class="task-list-item"><input type="checkbox" class="task-list-item-checkbox" disabled="disabled" checked="checked" />Can avoid the credentials from being exposed via the source code.</li>
  <li class="task-list-item"><input type="checkbox" class="task-list-item-checkbox" disabled="disabled" checked="checked" />Can avoid the credentials from being exposed via the built product.</li>
  <li class="task-list-item"><input type="checkbox" class="task-list-item-checkbox" disabled="disabled" checked="checked" />Can support the source code to be built without uploading the credentials.</li>
  <li class="task-list-item"><input type="checkbox" class="task-list-item-checkbox" disabled="disabled" checked="checked" />Can cooperate with GitHub Pages &amp; Actions to build the page automatically.</li>
  <li class="task-list-item"><input type="checkbox" class="task-list-item-checkbox" disabled="disabled" />New credentials can be added easily.</li>
</ul>

<h3 id="generalised-framework">Generalised Framework</h3>

<blockquote>
  <p>There is a node package called <code class="language-plaintext highlighter-rouge">dotenv</code>, which does exactly what the following framework does.</p>
</blockquote>

<p>To simplify adding new credentials, I packaged the key replacement into a more generalised framework.</p>

<ul class="task-list">
  <li class="task-list-item"><input type="checkbox" class="task-list-item-checkbox" disabled="disabled" checked="checked" />Can avoid the credentials from being exposed via the source code.</li>
  <li class="task-list-item"><input type="checkbox" class="task-list-item-checkbox" disabled="disabled" checked="checked" />Can avoid the credentials from being exposed via the built product.</li>
  <li class="task-list-item"><input type="checkbox" class="task-list-item-checkbox" disabled="disabled" checked="checked" />Can support the source code to be built without uploading the credentials.</li>
  <li class="task-list-item"><input type="checkbox" class="task-list-item-checkbox" disabled="disabled" checked="checked" />Can cooperate with GitHub Pages &amp; Actions to build the page automatically.</li>
  <li class="task-list-item"><input type="checkbox" class="task-list-item-checkbox" disabled="disabled" checked="checked" />New credentials can be added easily.</li>
</ul>

<h2 id="final-code-for-the-framework">Final Code for the framework</h2>

<p>The modified <code class="language-plaintext highlighter-rouge">vite.config.ts</code>:</p>

<div class="language-typescript highlighter-rouge"><div class="highlight"><pre class="highlight"><code><span class="k">import</span> <span class="p">{</span> <span class="nx">promises</span> <span class="k">as</span> <span class="nx">fs</span> <span class="p">}</span> <span class="k">from</span> <span class="dl">"</span><span class="s2">fs</span><span class="dl">"</span><span class="p">;</span> <span class="c1">// handling file operations in node</span>
<span class="k">import</span> <span class="p">{</span> <span class="nx">defineConfig</span> <span class="p">}</span> <span class="k">from</span> <span class="dl">"</span><span class="s2">vite</span><span class="dl">"</span><span class="p">;</span>

<span class="c1">// Default path for the credential configuration file</span>
<span class="kd">const</span> <span class="nx">credentialFileDefaultPath</span> <span class="o">=</span> <span class="dl">"</span><span class="s2">./credentials-config.json</span><span class="dl">"</span><span class="p">;</span>

<span class="c1">// Type definition for credential items</span>
<span class="kd">type</span> <span class="nx">CredentialItemType</span> <span class="o">=</span> <span class="p">{</span>
  <span class="na">name</span><span class="p">:</span> <span class="kr">string</span><span class="p">;</span>
  <span class="nl">type</span><span class="p">:</span> <span class="dl">"</span><span class="s2">string</span><span class="dl">"</span> <span class="o">|</span> <span class="dl">"</span><span class="s2">number</span><span class="dl">"</span><span class="p">;</span>
<span class="p">};</span>

<span class="c1">// List of credential items to be managed</span>
<span class="kd">const</span> <span class="nx">credentialItems</span><span class="p">:</span> <span class="nx">CredentialItemType</span><span class="p">[]</span> <span class="o">=</span> <span class="p">[</span>
  <span class="p">{</span>
    <span class="na">name</span><span class="p">:</span> <span class="dl">"</span><span class="s2">EXAMPLE_KEY</span><span class="dl">"</span><span class="p">,</span>
    <span class="na">type</span><span class="p">:</span> <span class="dl">"</span><span class="s2">string</span><span class="dl">"</span><span class="p">,</span>
  <span class="p">},</span>
<span class="p">];</span>

<span class="cm">/**
 * Check if a file exists at the given file path.
 * @param filePath - Path to the file.
 * @returns Promise&lt;boolean&gt; - True if the file exists, false otherwise.
 */</span>
<span class="k">async</span> <span class="kd">function</span> <span class="nx">checkFileExist</span><span class="p">(</span><span class="nx">filePath</span><span class="p">:</span> <span class="kr">string</span><span class="p">):</span> <span class="nb">Promise</span><span class="o">&lt;</span><span class="nx">boolean</span><span class="o">&gt;</span> <span class="p">{</span>
  <span class="k">try</span> <span class="p">{</span>
    <span class="k">await</span> <span class="nx">fs</span><span class="p">.</span><span class="nx">access</span><span class="p">(</span><span class="nx">filePath</span><span class="p">);</span>
    <span class="k">return</span> <span class="nb">Promise</span><span class="p">.</span><span class="nx">resolve</span><span class="p">(</span><span class="kc">true</span><span class="p">);</span>
  <span class="p">}</span> <span class="k">catch</span> <span class="p">(</span><span class="nx">error</span><span class="p">)</span> <span class="p">{</span>
    <span class="k">return</span> <span class="nb">Promise</span><span class="p">.</span><span class="nx">resolve</span><span class="p">(</span><span class="kc">false</span><span class="p">);</span>
  <span class="p">}</span>
<span class="p">}</span>

<span class="cm">/**
 * Read the content of a file.
 * @param filePath - Path to the file.
 * @returns Promise&lt;string&gt; - Content of the file.
 */</span>
<span class="k">async</span> <span class="kd">function</span> <span class="nx">readFile</span><span class="p">(</span><span class="nx">filePath</span><span class="p">:</span> <span class="kr">string</span><span class="p">):</span> <span class="nb">Promise</span><span class="o">&lt;</span><span class="kr">string</span><span class="o">&gt;</span> <span class="p">{</span>
  <span class="k">try</span> <span class="p">{</span>
    <span class="kd">const</span> <span class="nx">config</span> <span class="o">=</span> <span class="k">await</span> <span class="nx">fs</span><span class="p">.</span><span class="nx">readFile</span><span class="p">(</span><span class="nx">filePath</span><span class="p">,</span> <span class="p">{</span>
      <span class="na">encoding</span><span class="p">:</span> <span class="dl">"</span><span class="s2">utf-8</span><span class="dl">"</span><span class="p">,</span>
    <span class="p">});</span>
    <span class="k">return</span> <span class="nb">Promise</span><span class="p">.</span><span class="nx">resolve</span><span class="p">(</span><span class="nx">config</span><span class="p">);</span>
  <span class="p">}</span> <span class="k">catch</span> <span class="p">(</span><span class="nx">err</span><span class="p">)</span> <span class="p">{</span>
    <span class="k">return</span> <span class="nb">Promise</span><span class="p">.</span><span class="nx">reject</span><span class="p">(</span><span class="s2">`Cannot read from the file "</span><span class="p">${</span><span class="nx">filePath</span><span class="p">}</span><span class="s2">"`</span><span class="p">);</span>
  <span class="p">}</span>
<span class="p">}</span>

<span class="cm">/**
 * Load credentials from a specified file path or environment variables.
 * @param credentialFilePath - Path to the credential configuration file.
 * @returns Promise&lt;Record&lt;string, string&gt;&gt; - An object containing the final credentials.
 */</span>
<span class="k">async</span> <span class="kd">function</span> <span class="nx">getCredentials</span><span class="p">(</span><span class="nx">credentialFilePath</span><span class="p">:</span> <span class="kr">string</span><span class="p">)</span> <span class="p">{</span>
  <span class="c1">// Log the use of a custom credential configuration file</span>
  <span class="k">if</span> <span class="p">(</span><span class="nx">credentialFilePath</span> <span class="o">!==</span> <span class="nx">credentialFileDefaultPath</span><span class="p">)</span> <span class="p">{</span>
    <span class="nx">console</span><span class="p">.</span><span class="nx">log</span><span class="p">(</span><span class="s2">`Using credential configuration file: </span><span class="p">${</span><span class="nx">credentialFilePath</span><span class="p">}</span><span class="s2">`</span><span class="p">);</span>
  <span class="p">}</span>

  <span class="c1">// Check if the credential file exists</span>
  <span class="kd">const</span> <span class="nx">credentialFileExist</span> <span class="o">=</span> <span class="k">await</span> <span class="nx">checkFileExist</span><span class="p">(</span><span class="nx">credentialFilePath</span><span class="p">);</span>
  <span class="c1">// Load credential file content if it exists, otherwise use an empty object</span>
  <span class="kd">const</span> <span class="nx">credentialFileContent</span><span class="p">:</span> <span class="nb">Record</span><span class="o">&lt;</span><span class="kr">string</span><span class="p">,</span> <span class="kr">string</span> <span class="o">|</span> <span class="kr">number</span><span class="o">&gt;</span> <span class="o">=</span>
    <span class="nx">credentialFileExist</span> <span class="p">?</span> <span class="nx">JSON</span><span class="p">.</span><span class="nx">parse</span><span class="p">(</span><span class="k">await</span> <span class="nx">readFile</span><span class="p">(</span><span class="nx">credentialFilePath</span><span class="p">))</span> <span class="p">:</span> <span class="p">{};</span>
  <span class="c1">// Object to hold the final credentials</span>
  <span class="kd">const</span> <span class="nx">finalCredential</span><span class="p">:</span> <span class="nb">Record</span><span class="o">&lt;</span><span class="kr">string</span><span class="p">,</span> <span class="kr">string</span><span class="o">&gt;</span> <span class="o">=</span> <span class="p">{};</span>

  <span class="c1">// Iterate over each credential item</span>
  <span class="nx">credentialItems</span><span class="p">.</span><span class="nx">forEach</span><span class="p">((</span><span class="nx">item</span><span class="p">)</span> <span class="o">=&gt;</span> <span class="p">{</span>
    <span class="c1">// Try to get the value from environment variables or credential file content</span>
    <span class="kd">let</span> <span class="na">value</span><span class="p">:</span> <span class="kr">string</span> <span class="o">|</span> <span class="kr">number</span> <span class="o">|</span> <span class="kc">undefined</span> <span class="o">=</span>
      <span class="nx">process</span><span class="p">.</span><span class="nx">env</span><span class="p">[</span><span class="nx">item</span><span class="p">.</span><span class="nx">name</span><span class="p">]</span> <span class="o">||</span> <span class="nx">credentialFileContent</span><span class="p">[</span><span class="nx">item</span><span class="p">.</span><span class="nx">name</span><span class="p">]</span> <span class="o">||</span> <span class="kc">undefined</span><span class="p">;</span>

    <span class="c1">// If value is undefined, issue a warning and set it to an empty string</span>
    <span class="k">if</span> <span class="p">(</span><span class="k">typeof</span> <span class="nx">value</span> <span class="o">===</span> <span class="dl">"</span><span class="s2">undefined</span><span class="dl">"</span><span class="p">)</span> <span class="p">{</span>
      <span class="nx">console</span><span class="p">.</span><span class="nx">warn</span><span class="p">(</span>
        <span class="dl">"</span><span class="se">\</span><span class="s2">x1b[33m%s</span><span class="se">\</span><span class="s2">x1b[0m</span><span class="dl">"</span><span class="p">,</span>
        <span class="s2">`Credential item "</span><span class="p">${</span><span class="nx">item</span><span class="p">.</span><span class="nx">name</span><span class="p">}</span><span class="s2">" cannot be found in the environment or the "</span><span class="p">${</span><span class="nx">credentialFilePath</span><span class="p">}</span><span class="s2">"`</span>
      <span class="p">);</span>
      <span class="nx">value</span> <span class="o">=</span> <span class="dl">""</span><span class="p">;</span>
    <span class="p">}</span>

    <span class="c1">// Convert the value to the appropriate type</span>
    <span class="k">if</span> <span class="p">(</span><span class="nx">item</span><span class="p">.</span><span class="kd">type</span> <span class="o">===</span> <span class="dl">"</span><span class="s2">string</span><span class="dl">"</span><span class="p">)</span> <span class="nx">value</span> <span class="o">=</span> <span class="nb">String</span><span class="p">(</span><span class="nx">value</span><span class="p">);</span>
    <span class="k">else</span> <span class="k">if</span> <span class="p">(</span><span class="nx">item</span><span class="p">.</span><span class="kd">type</span> <span class="o">===</span> <span class="dl">"</span><span class="s2">number</span><span class="dl">"</span><span class="p">)</span> <span class="nx">value</span> <span class="o">=</span> <span class="nb">Number</span><span class="p">(</span><span class="nx">value</span><span class="p">);</span>

    <span class="c1">// Add the formatted credential to the finalCredential object</span>
    <span class="nx">finalCredential</span><span class="p">[</span><span class="s2">`__</span><span class="p">${</span><span class="nx">item</span><span class="p">.</span><span class="nx">name</span><span class="p">}</span><span class="s2">__`</span><span class="p">]</span> <span class="o">=</span> <span class="nx">JSON</span><span class="p">.</span><span class="nx">stringify</span><span class="p">(</span><span class="nx">value</span><span class="p">);</span>
  <span class="p">});</span>

  <span class="k">return</span> <span class="nx">finalCredential</span><span class="p">;</span>
<span class="p">}</span>

<span class="c1">// Export the Vite configuration</span>
<span class="k">export</span> <span class="k">default</span> <span class="nx">defineConfig</span><span class="p">(</span><span class="k">async</span> <span class="p">()</span> <span class="o">=&gt;</span> <span class="p">{</span>
  <span class="c1">// Get the path for the credential configuration file, defaulting to the specified default path</span>
  <span class="kd">const</span> <span class="nx">credentialsConfigPath</span> <span class="o">=</span>
    <span class="nx">process</span><span class="p">.</span><span class="nx">env</span><span class="p">.</span><span class="nx">CREDENTIALS_CONFIG_PATH</span> <span class="o">||</span> <span class="nx">credentialFileDefaultPath</span><span class="p">;</span>

  <span class="k">return</span> <span class="p">{</span>
    <span class="c1">// Define global constants with the loaded credentials</span>
    <span class="na">define</span><span class="p">:</span> <span class="k">await</span> <span class="nx">getCredentials</span><span class="p">(</span><span class="nx">credentialsConfigPath</span><span class="p">),</span>
  <span class="p">};</span>
<span class="p">});</span>
</code></pre></div></div>

<h2 id="conclusion">Conclusion</h2>

<p>This framework simplifies secure credential management for open-source projects by using private configuration files and environment variables. It ensures credentials are protected while supporting automated builds with GitHub Actions. This approach helps maintain security without complicating the development process.</p>

<h2 id="references">References</h2>

<ul>
  <li><a href="https://github.com/Anson2251/trackmaker/blob/main/README.md">Trackmaker Project README.md</a>, accessed July 27, 2024.</li>
  <li><a href="https://vitejs.dev/config/shared-options.html#define">Vite Configuration <code class="language-plaintext highlighter-rouge">define</code></a>, accessed July 27, 2024.</li>
</ul>]]></content><author><name></name></author><category term="credentials" /><category term="programming" /><summary type="html"><![CDATA[]]></summary></entry><entry><title type="html">New Blog Site!</title><link href="https://anson2251.github.io/jekyll/2024/06/24/new-blog-site.html" rel="alternate" type="text/html" title="New Blog Site!" /><published>2024-06-24T01:00:00+00:00</published><updated>2024-06-24T01:00:00+00:00</updated><id>https://anson2251.github.io/jekyll/2024/06/24/new-blog-site</id><content type="html" xml:base="https://anson2251.github.io/jekyll/2024/06/24/new-blog-site.html"><![CDATA[<style>
*:not(code, .katex *) {
    font-family: 'Segoe UI', Tahoma, Geneva, Verdana, sans-serif;
}

p {
    overflow: auto;
}

code, span:is(.highlight *) {
    font-family: 'Consola', 'Menlo', 'Courier New', Courier, monospace;
    border-radius: 4px;
    background-color: #f0f0f0 !important;
}

.highlight:is(pre)  {
    background-color: #f0f0f0 !important;
    box-shadow: inset 0 1px 1px rgba(255, 255, 2555, 0.3); 
    border-radius: 4px;

}

.highlight:is(div) {
    margin: 4px 8px;
    border-radius: 4px;

}
</style>

<link href="/assets/fonts/barlow.css" rel="stylesheet" />

<h2 id="introduction">Introduction</h2>

<p>I have updated my personal site to replace the previous plain Markdown-based site. The new site is built on Jekyll, allowing for better presentation and easier organization of my content.</p>

<h2 id="migration-of-content">Migration of Content</h2>

<p>I will be transferring the content from the <code class="language-plaintext highlighter-rouge">Useful Links</code> section of the old site into individual blog posts that explain how the projects work. This process will take some time, but I will complete it gradually.</p>

<h2 id="useful-links-from-the-previous-page">Useful Links from the Previous Page</h2>

<ul>
  <li>The repository for this site: <a href="https://github.com/Anson2251/Anson2251.github.io">这个主页的储存库</a></li>
  <li>Sequence Calculator: <a href="https://anson2251.github.io/sequence/">数列计算器</a></li>
  <li>Binomial Expansion Calculator: <a href="https://anson2251.github.io/binomial-expansion-calculator/">展开 (a+b)^n</a></li>
  <li>Solve2048 Demo: <a href="https://anson2251.github.io/solve2048/">solve2048 demo</a></li>
</ul>

<h2 id="why-jekyll">Why Jekyll?</h2>

<p>Jekyll is a convenient tool for transforming plain text, written in Markdown, into static websites and blogs, which suits my preferences perfectly. GitHub also supports Jekyll with workflows for building and hosting the site online, allowing for a smooth transition.</p>

<h2 id="future-posts">Future Posts</h2>

<p>In upcoming posts, I will explain the design ideas behind the projects listed in the <code class="language-plaintext highlighter-rouge">Useful Links</code> section. I will also refurbish the projects and update the README files for each project.</p>]]></content><author><name></name></author><category term="jekyll" /><summary type="html"><![CDATA[]]></summary></entry></feed>